I love baking traybake bakes because of the ease that they present. You mix the batter and you spread them on a greased and prepared pans, pop them in the oven, wait for the appropriate time, et voila! You have cake!

However, that being said, I do love the care and attention that’s required when making cookies, or as the Brits call them, biscuits. I love the drop cookies and the cookies that require a bit more care and precision and a cookie cutter. It’s the care and attention that is involved in making each biscuit that counts. Each piece is individual.
One of my favourite cookies to bake (and eat) are almond cookies. These cookies are Chinese bakery staples and most of my Chinese friends have a happy childhood memory involving an almond cookie. So when Alan found a recipe and we perfected the recipe and cookie production, it became a staple for us.

Sure, it’s a little more complicated than mixing the batter and dolloping them on a cookie sheet, but it’s the process that makes it special. Because every time you scoop the mixture, press the almond into the centre and brush egg wash on each cookie, you are putting a little piece of you in the cookie. Too sentimental? Okay, here’s the recipe instead!
Ingredients:
- 125g unsalted butter
- 170g caster sugar
- 1 egg
- 200g plain flour
- ½ tsp baking powder
- ½ tsp salt
- ½ tsp almond extract
- 150g ground almonds
- 24 blanched almonds
- 1 egg (beaten for brushing)
Directions:
- Preheat the oven to 180°C. Cream together the butter, sugar and salt. Then add the almond extract and egg, and mix well. Slowly add the flour, the baking powder and ground almonds and make sure it is all combined.
- Line a couple of baking trays with baking paper and then divide the mixture into 24 equal sized balls. I use a small ice cream scooper to the balls uniform. Lay the balls out on the baking trays and use a round measuring spoon to press an indentation in the middle of the ball. This will also flatten the ball into a cookie shape. If you do not have a round measuring spoon, flatten the ball with your hand and indent with your thumb. Place a blanched almond into the indentation of each cookie and then brush with egg.
- Place into the oven for 12-14 minutes or until the cookies are lightly golden. Allow cookies to cool down for 10 minutes. Reduce the oven to 150°C.
- Brush the cookies with more beaten egg. Bake for 10-15 minutes or until they turn golden. Allow to cool completely and store in an airtight container.
- This recipe makes approximately 24 cookies. If you’re not making halal versions, you can also add about 1 generous tablespoon of Amaretto liqueur to make it even more almondy.
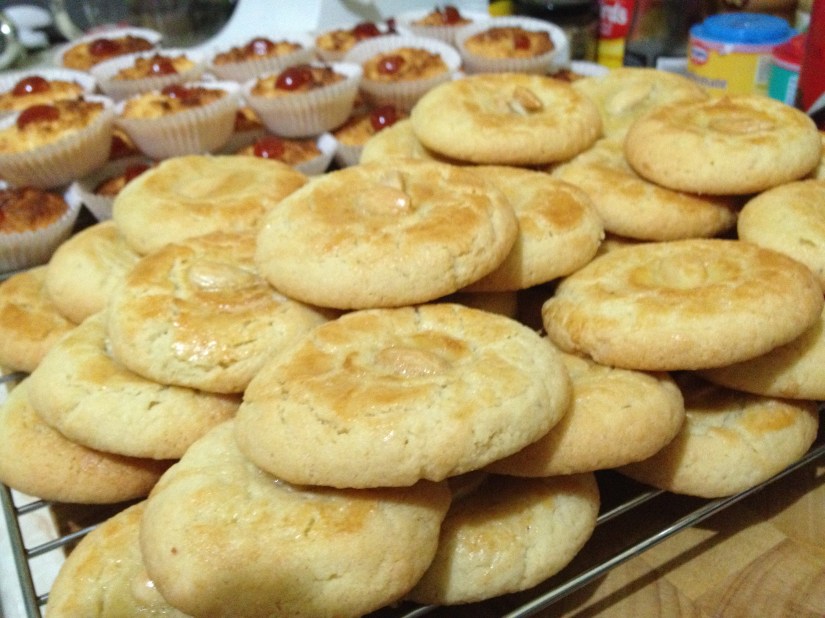
Thank you to Yuki (she’s @the_yukistar on Instagram. Have a look at her photos, they are blow-you-away amazing!) for the lovely photos of the almond cookies! She made them look extra pretty!💖