Yelly Eats

How To Make Chinese Almond Cookies

Almond cookies are a staple both in Chinese bakers and in Chinese kids’ childhood memories.  Everyone has an almond cookie experience that makes them smile (or at least that’s what I have been told).  Alan’s recipe is very similar to mine and this recipe was posted on our Pan-Asian Kitchen blog and I am sharing this with you on Yellywelly.  Text, photos and food fluffing all by Alan.


I always remember eating almond cookies in one form or another since I was young and even though I did like them, none of them were memorable until about 16 years ago when I got the opportunity to go over to Canada for 6 weeks (around the Christmas and New Year holidays) to spend some time visiting my aunts and uncles whom I had not seen since I was very young. A small issue I had was that I had started a new job a few weeks before the trip and had to explain to my boss (James) about the trip that was planned. As well as letting me go on the trip, he lent me a suitcase and gave me a lift to the airport on the day I flew out. Amongst the gifts that I brought back, I purchased several boxes of Chinese Almond Cookies from the Market Village Chinese Mall to say thank you to James for his help. I kept a box back for myself so that I could try the cookies and found that they were the most delicious almond cookies that I had tasted. Looking around Chinatown in London, I could not find almond cookies that looked like the ones I got from Canada. I even tried the ones from the Chinese bakeries but they did not look or taste the same as how I remembered them.

Several years had passed and I was teaching myself to bake new things and remembered back to the almond cookies that I purchased from Market Village. I had a look around for recipes for almond cookies and they all seem to have the same quantities of butter, flour and sugar but the almond flavour didn’t come through enough so have doubled the amount of ground almonds and added almond extract to give them an almondy boost. So after a few attempts of perfecting the recipe, here is my take on the Chinese Almond Cookie. This cookie is great for a treat or to give as a present to friends or family.

Chinese Almond Cookies
Ingredients (makes approx 24 cookies)

125g unsalted butter (softened)
170g caster sugar
1/2 tsp salt

1/2 tsp almond extract (or 1 tbsp of amaretto)
1 egg

200g plain flour
1/2 tsp baking powder
150g ground almonds

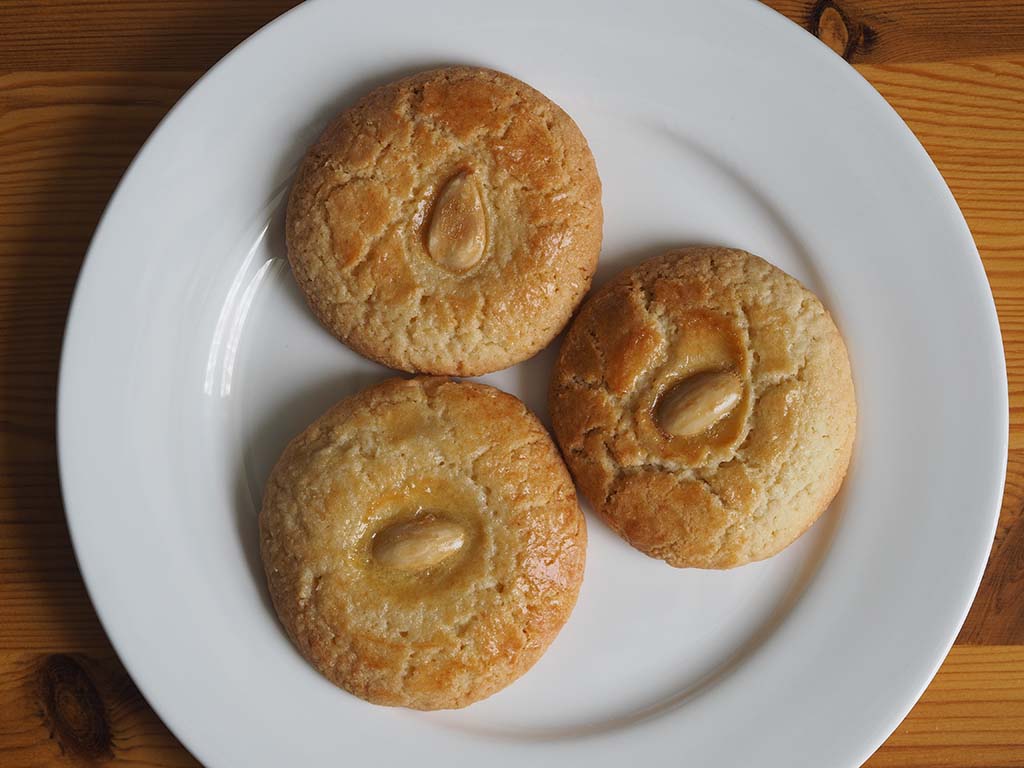
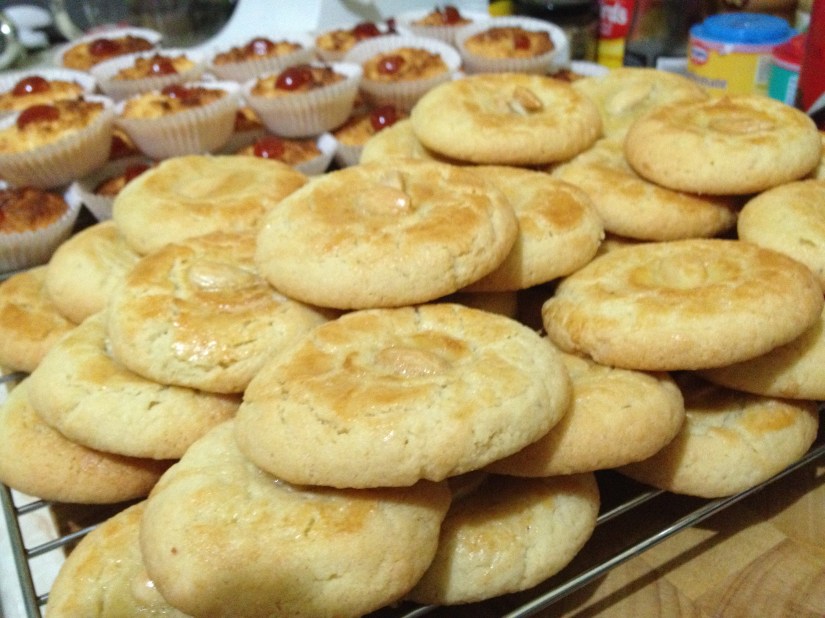
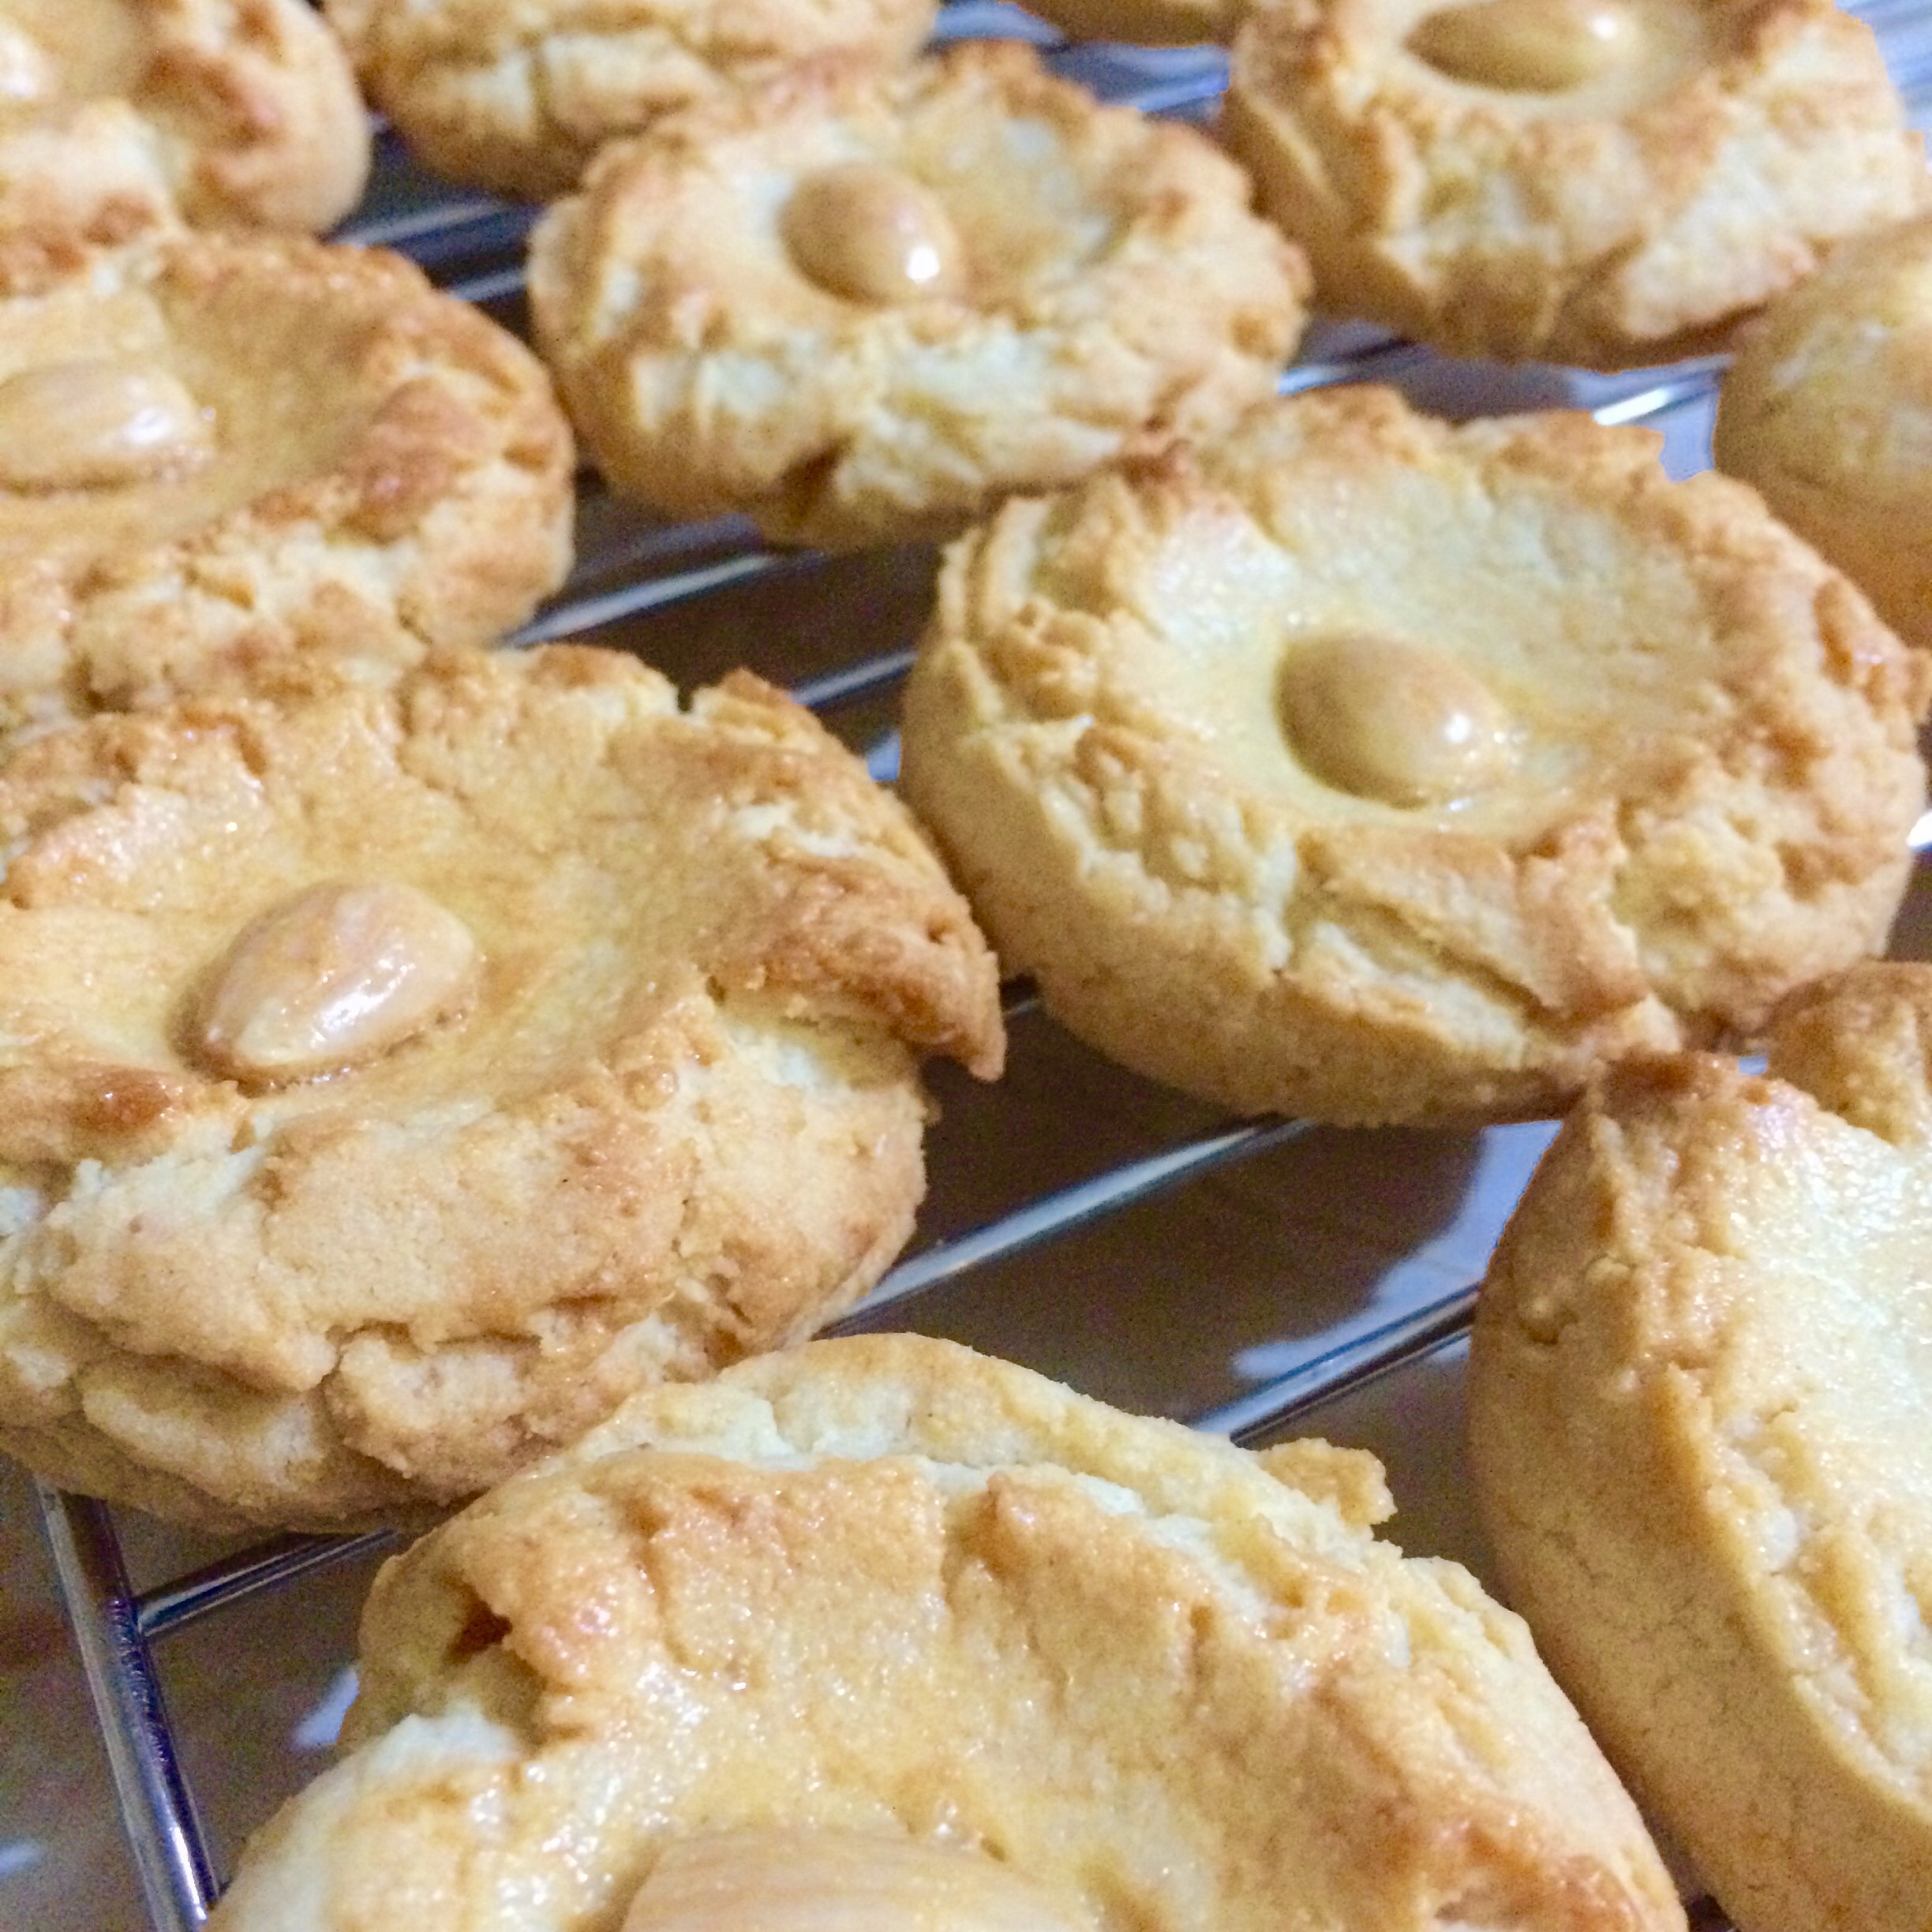
24 blanched almonds or 24 pieces of sliced almonds
1 egg (beaten)

Instructions:

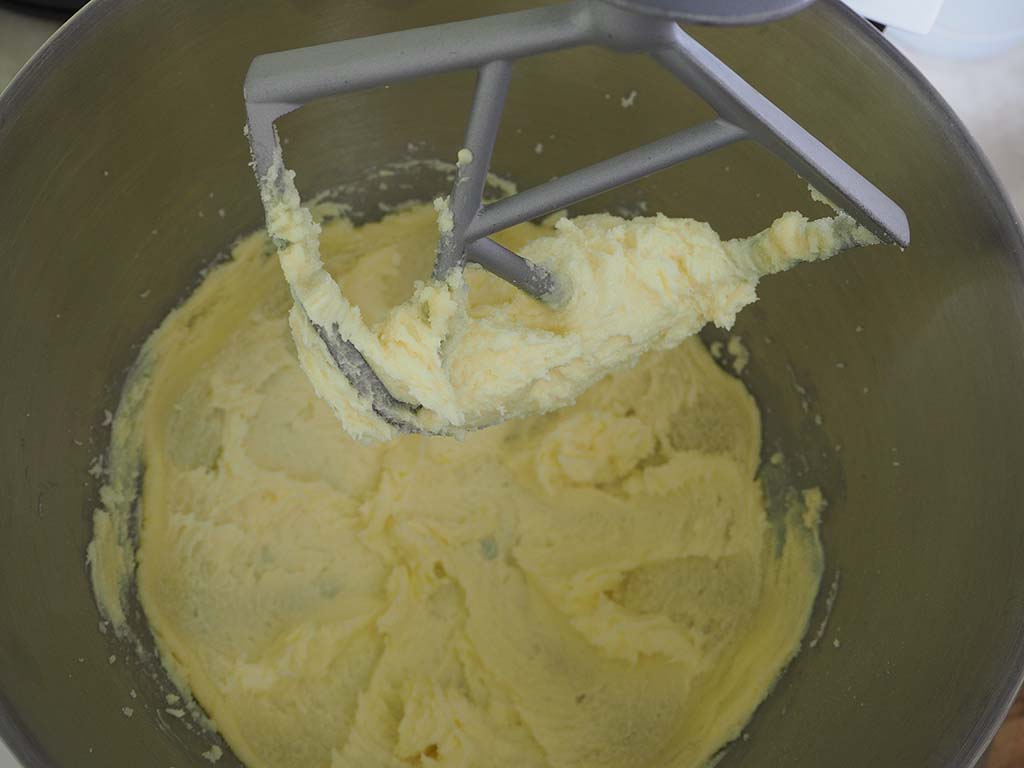
1. In a bowl, cream together the butter, sugar and salt.

2. Add the egg and almond extract and mix together.

3. Slowly add the flour, the baking powder and ground almonds into the mixture.

To do this, add a few dessert spoons of the dry ingredients at a time and combine together. Repeat the process until it is all mixed well.

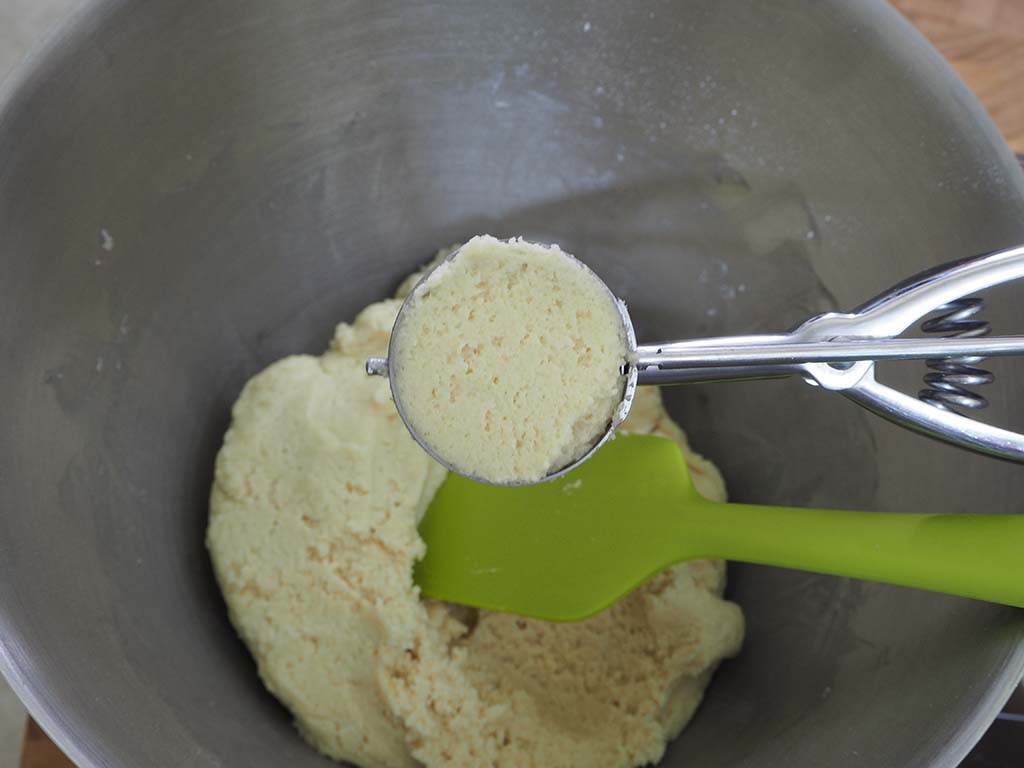
4. Preheat the oven to 180°C/360°F (170°C/340°F if using a fan oven). Line a couple of baking trays with baking paper and then divide the mixture into 24 equal sized balls which are roughly walnut sized. To help potion off the mixture evenly, I used a sized 40 ice cream scoop and levelled it off with a spatula but you can do it by eye if you do not have a scoop.

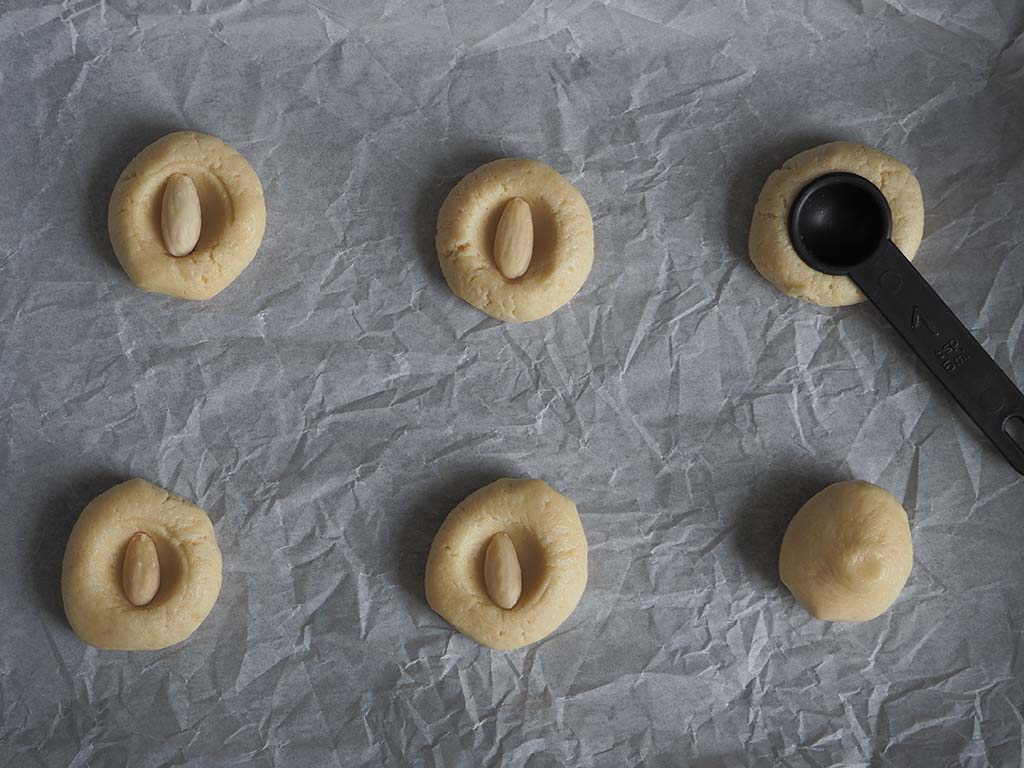
5. Put the cookies dough balls on the baking trays (leave a 1” gap between the cookies as they do spread out slightly, you may need to bake in several batches if you use smaller baking trays) and use a round measuring spoon to press an indentation in the middle of the ball (in this case, I used a 1 tsp measuring spoon as the blanched almonds just about fit inside). By using the measuring spoon to press the indentation into the ball, it will also flatten the ball into a cookie shape. If you do not have a round measuring spoon, flatten the ball with your hand and make the indentation with your thumb. Put a blanched almond or a slice of almond into the indentation of each cookie.

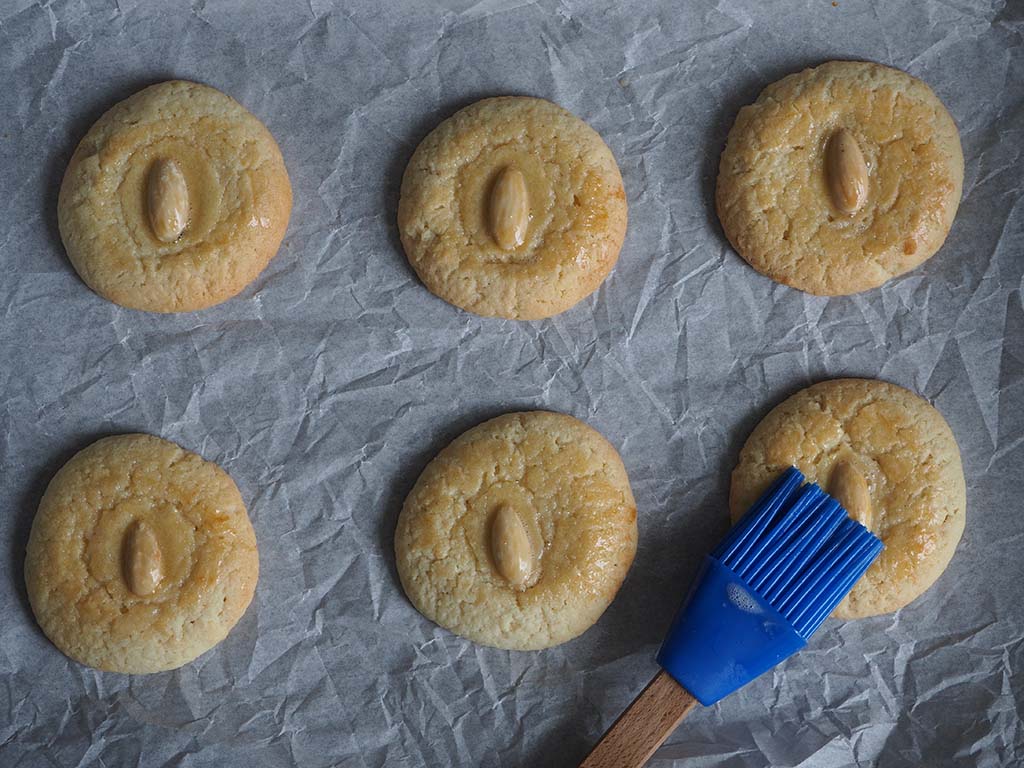
6. Brush each cookie with the beaten egg.

7. Bake the cookies for 10 minutes or until the cookies are a lightly golden colour. Allow cookies to cool down for roughly 10 minutes. Reduce the oven to 160°C/320°F (150°C/300°F if using a fan oven).

8. Brush the cookies with more beaten egg and bake for another 10-15 minutes or until they turn golden brown.

Allow to cool down completely before storing in an airtight container.

Yelly Eats

Almond cookies!

I love baking traybake bakes because of the ease that they present.  You mix the batter and you spread them on a greased and prepared pans, pop them in the oven, wait for the appropriate time, et voila!  You have cake!

photo © @the_yukistar

However, that being said, I do love the care and attention that’s required when making cookies, or as the Brits call them, biscuits.  I love the drop cookies and the cookies that require a bit more care and precision and a cookie cutter.  It’s the care and attention that is involved in making each biscuit that counts.  Each piece is individual.

One of my favourite cookies to bake (and eat) are almond cookies.  These cookies are Chinese bakery staples and most of my Chinese friends have a happy childhood memory involving an almond cookie.  So when Alan found a recipe and we perfected the recipe and cookie production, it became a staple for us.

photo © @the_yukistar

Sure, it’s a little more complicated than mixing the batter and dolloping them on a cookie sheet, but it’s the process that makes it special.  Because every time you scoop the mixture, press the almond into the centre and brush egg wash on each cookie, you are putting a little piece of you in the cookie.  Too sentimental?  Okay, here’s the recipe instead!

Ingredients:

  • 125g unsalted butter
  • 170g caster sugar
  • 1 egg
  • 200g plain flour
  • ½ tsp baking powder
  • ½ tsp salt
  • ½ tsp almond extract
  • 150g ground almonds
  • 24 blanched almonds
  • 1 egg (beaten for brushing)

Directions:

  1. Preheat the oven to 180°C.  Cream together the butter, sugar and salt.  Then add the almond extract and egg, and mix well.  Slowly add the flour, the baking powder and ground almonds and make sure it is all combined.
  2. Line a couple of baking trays with baking paper and then divide the mixture into 24 equal sized balls.   I use a small ice cream scooper to the balls uniform.  Lay the balls out on the baking trays and use a round measuring spoon to press an indentation in the middle of the ball.  This will also flatten the ball into a cookie shape.  If you do not have a round measuring spoon, flatten the ball with your hand and indent with your thumb.  Place a blanched almond into the indentation of each cookie and then brush with egg.
  3. Place into the oven for 12-14 minutes or until the cookies are lightly golden.  Allow cookies to cool down for 10 minutes.  Reduce the oven to 150°C.
  4. Brush the cookies with more beaten egg.  Bake for 10-15 minutes or until they turn golden.  Allow to cool completely and store in an airtight container.
  5. This recipe makes approximately 24 cookies.  If you’re not making halal versions, you can also add about 1 generous tablespoon of Amaretto liqueur to make it even more almondy.  

Thank you to Yuki (she’s @the_yukistar on Instagram.  Have a look at her photos, they are blow-you-away amazing!) for the lovely photos of the almond cookies!  She made them look extra pretty!💖

Yelly Eats

Chocolate crinkles

Over a week ago, I gave in to the urge to finally make chocolate crinkles.  It’s a popular cookie in the Philippines.  It’s rich, indulgent and fudgy.  It’s something that might just make you go mmmmm.  I approached the idea of making crinkles with a little trepidation.  I always worry that my memories of what things taste like in Manila is different from reality.  But I did manage to work up the courage to finally make crinkles!

Chocolate crinkleI’ve written a recipe that I’ve tweaked below and I know that it works.  I would love for y’all to make chocolate crinkles and let me know if the recipe works for you.

Ingredients:

  • 150g unsweetened cocoa powder
  • 280g caster sugar
  • 150ml vegetable oil
  • 4 large eggs
  • 2 teaspoons vanilla extract
  • 300g plain flour
  • 2 teaspoons baking powder
  • ½ salt
  • 150g icing sugar

Directions:

In a bowl, using a balloon whisk, mix the flour, salt and baking powder together and set aside. In a mixing bowl, combine the cocoa powder, sugar and oil.  To mix, I’ll use a free-standing mixer.

Chocolate mixtureWith a paddle attachment, on the lowest setting (just so that the cocoa powder doesn’t fly all over the place), start mixing the cocoa powder, sugar and oil for about 2 minutes.  Once the mixture forms a thick paste, increase the speed and mix for a further 2 minutes.  The mixture should turn shiny and smooth.  Add each egg individually and mix until the mixture is again shiny.  Once all the eggs are added, add the vanilla.

Chocolate and egg mixAdd the flour mixture and mix until well-incorporated and the mixture is smooth.

Chocolate and flour mixCover the mixture and chill in the fridge for at least 2½ hours (I initially only chilled it for 1½ hours and it seemed to be okay), the longer you chill it, the better.

Chocolate mixPreheat the oven to 175°C (350°F).  Line your baking sheets with parchment paper.  I like to use a small ice cream scoop or a 1 tablespoon measuring spoon.

Chocolate crinkle mixScoop a generous 1 tablespoon of the mixture and roll it into a ball.  Coat each ball with icing sugar and place on the lined sheet.

Crinkles in icing sugarBake for 10-12 minutes.  Once the cookies are baked, take them out of the oven and allow to cool on the sheets for about 5 minutes before transferring them onto a wire rack to cool completely.

Crinkles for bakingThe cookies have a recognisable cracked surface and that’s how you know it’s a chocolate crinkle!

Choccie crinkleThis recipe makes about 40 crinkles.

Yelly Eats

The power of the crinkle

I comfort eat.  Now I know psychologists and nutritionists and every healthcare professional reading this will be gasping and tutting and shaking their head right now.  Comfort eating is a terrible coping mechanism and will have far reaching consequences.  Ha!  How highfalluting and technical-sounding is that sentence, eh?  Mind you, I am very aware my comfort eating has allowed me to balloon and gain a whole child in terms of weight since I moved to the UK.

Apart from the comfort eating, I’ve been comfort cooking and comfort baking.  I’ve been trying to recreate in my kitchen the food that was readily available to me in the Philippines.  My favourite English proverb (which helps me justify my kitchen sessions) is: “Necessity  is the mother of invention.”  Mind you, the food that I produce in my kitchen aren’t necessarily my own inventions.  Sometimes it’s a result of me trawling the internet for tips on how to cook Filipino food.  Since Filipino food isn’t readily available to take away or to buy at the nearest convenience store, I’ve got to learn how to make things myself if I miss eating them.  I’m quite pleased that I’m able to make things that I would normally just go out and buy if I was in the Philippines.

I finally gave in to a long-standing baking to-do: making chocolate crinkles.  Chocolate crinkles will feature in most Filipinos’ top 10 list of their favourite cookies.  I’m not entirely certain whether it is a Filipino invention but it is certainly readily available in the Philippines, everywhere.  Say the phrase “chocolate crinkles” to a Filipino and you more often than not will hear them say “Awww chocolate crinkles!”

For those of you who don’t know, chocolate crinkles are soft, fudgy chocolate cookies that are slightly firm, almost crispy, on the outside and moist and cakey on the inside.  It’s covered with a generous coating of icing sugar outside and when you bite into the cookie, it’s rich and indulgent.

I’m going to share the recipe here once I’ve tried another test run, just to make sure that the recipe works properly.  Any taste testers available?

Chocolate crinkle

Save

Yelly Eats

Fruitcake oatmeal cookies

I was craving cookies.

I knew I had enough ingredients in the cupboard to whip up drop cookies.  I leafed through my cookbooks for inspiration and decided on oatmeal raisin cookies as the recipe from the Hummingbird Bakery Cookbook was making my tummy growl in anticipation!  I started to get the ingredients together and found a bag with about with still a third of the mixed dried fruit and peel languishing in my baking supplies basket.  So instead of following the recipe in the cookbook, I improvised and put together what I call a cupboard cookie recipe – because you’re basically using ingredients you find in your cupboard!

Ingredients:

  • 135g unsalted butter, room temperature and softened
  • 80g soft brown sugar
  • 80g caster sugar
  • 1 egg
  • 1 teaspoon vanilla extract
  • 190g plain flour
  • 80g oatmeal (I used wholegrain rolled oats, but quick cooking oats work too)
  • 1 heaping teaspoon cinnamon
  • ½ teaspoon salt
  • ½ teaspoon bicarbonate of soda (baking soda)
  • 110g of mixed dried fruit and peel
  • 70g ground almonds, optional

Directions:

  1. Preheat the oven to 170°C
  2. In a bowl, mix flour, oats, dried fruit, salt, bicarbonate of soda, cinnamon and ground almonds (if using), until well-incorporated.
  3. Because my hands get tired really quickly, I now, more often than not use a mixer, but this can be done by hand (it’ll just take a lot of elbow power) first with a pastry blender (which I will always call a pastry cutter) and then with a balloon whisk.  Cream the butter and sugars until the mixture is smooth and a light brown colour.  Add the egg and the vanilla and mix until well-combined.
  4. Add the flour and dried fruit mixture to the sugar and butter mixture until combined and you can no longer see the flour.
  5. Drop batter, a heaping tablespoon at a time, onto a lined baking tray (Useful tip: if you’d like more uniform-sized cookies, use an ice-cream scooper.  I use a 45mm one.).  Make sure the cookies are evenly spaced.  I bake 6 cookies per tray.
  6. Bake in the preheated oven for 11-13 minutes.  Remove from the oven and allow to sit in the baking tray for about 5 minutes and then transfer to a wire rack to cool completely.
  7. Makes 24 cookies.

Fruitcake oatmeal cookies

Yelly Eats

Custard creams!

Cooking and baking has become a way for me to reconnect with the food that I loved to eat in the Philippines.  Since moving to the UK, I’ve had to rely on my food prep skills instead of having my mum cook my favourite dishes for me.  I’ve always loved it and cooking and baking were my creative outlets.  It always made me smile when people said that something I made was really good.  But when I was in the Philippines, cooking and baking the dishes I wanted to prepare was more frustrating than relaxing because I couldn’t get a lot of the ingredients that I needed.

Things have changed though since I moved to England.  I can now attempt most of the recipes that I’ve been wanting to try because the ingredients are more accessible (it’s the Southeast Asian ingredients that are now not as accessible as they were in the Philippines! Ha!).  As a result, my cookbook collection has grown to a 32-strong contingent!

This year, the resolve is to actually USE my cookbooks and cook or bake 1 recipe a weekend.  A Passion For Baking by Jo Wheatley

I decided to start with a custard cream recipe from Jo Wheatley’s book A Passion For Baking.   I’ve been reading a lot of good things on Twitter and Facebook about Jo’s recipes.  Jo Wheatley was the winner of the second season of the Great British Bake Off.  I must admit that it was because of the GBBO shows that I took up baking again.  Before that I would just bake the occasional cake or cupcake but now I’ve been reading up on baking techniques and expanding my baking repertoire.

Jo’s custard cream recipe is great.  She breaks the down in stages and the preparation instructions are easy to follow.  I had to chill my cookie dough though for about 30 minutes instead of the suggested 20.  As each oven is different, I baked my biscuits for 15 minutes instead of the prescribed 10-12.  They weren’t golden enough.  But once out of the oven, they smelled heavenly and the biscuits were lovely and short!  What I loved the most is that the recipe page is laid out in two columns.  One column has ingredients and the suggested equipment that lets you prepare them before you start baking.  The other column has the preparation directions.  It was so lovely and organised!  I try to be organised in the kitchen becaused I think the trick to cooking and baking well is being organised.

My cookies are lovely and golden and what I appreciate most is that it doesn’t have as much sugar as I thought it would.  Being a diabetic means that I have to limit my sweet treat moments and unfortunately for me, custard creams are a guilty pleasure.  Maybe now I can develop a custard cream recipe that is more diabetic-friendly!  But the best bit of the recipe is that it makes about 20 biscuits which makes 10 custard creams.  They are moreish but at least there isn’t a lot scoff down!  Ha!

Custard creams

Yelly Eats

Luxurious oatmeal cookies

I love oatmeal cookies.  I remember late nights with warm cookies and a large glass of milk. Oatmeal cookies are comforting and they remind me of home.  There’s something about the smell of cinnamon wafting from the oven that just brings out the happy hormones.

This recipe is slightly more luxurious because of the amount of butter that is used in the recipe.  But it is definitely worth it.  The cookies are yummy and chewy.  I try to justify it by saying it is oatmeal, and oatmeal IS healthy and good for you!

Oatmeal CookiesIngredients:

  • 270g unsalted butter, at room temperature
  • 160g caster sugar
  • 160g soft dark brown sugar
  • 2 eggs
  • 1 teaspoon vanilla extract
  • 380g plain flour
  • 1 teaspoon bicarbonate of soda
  • 1 teaspoon salt
  • 3 teaspoons ground cinnamon
  • 200g quick cooking oats
  • 225g raisins

Method

  1. Preheat oven to 180°C (360°F).
  2. In a bowl, mix flour, oats, salt, bicarbonate of soda and cinnamon together with a balloon whisk until well-combined.  Set aside.
  3. In another mixing bowl, cream butter and sugars together (I use a rubber spatula but you can always use a handheld mixer) until light and fluffy.  Add the eggs one at a time, mixing well and making sure that you scrape the sides of the bowl so that you mix all the ingredients well.
  4. Add the flour-oats mixture to the butter mixture in thirds, mixing well eat time.  Stir in the raisings until evenly distributed.
  5. To make relatively uniform sized cookies, I use a 18/8 gauge ice cream scooper.  If you use the scooper, this makes about 42 cookies.  Arrange the cookie batter scoops on a tray, evenly spaced.
  6. Bake for about 12 minutes, make sure that you check the cookies at the 10 minute mark to make sure they aren’t burning.
  7. Remove from the oven and allow to cool slightly on trays before turning out on wire cooling racks to cool completely.
Yelly Eats

Neiman Marcus Cookies

This recipe has been making the rounds for ages.  My aunt sent me the recipe a few months ago with a request that I try out the recipe and perfect making it, so that when I went home to Manila for a visit, I could bake the cookies for her.  I’ve been planning the cookie bake for ages, but have had other baking projects in the works.  But tonight was the night for the so-called Neiman Marcus cookies.

The recipe calls for nuts, and I chose to use 2 kinds: pecans and hazelnuts.  I didn’t add the Hershey bar shavings anymore because I felt that there were enough chocolate chip cookies for it to be oh-s0-chocolatey already.

Here’s the recipe, as I received it.  I halved the recipe and it yielded 50 cookies already!

NEIMAN-MARCUS COOKIES (Recipe may  be halved)Neiman Marcus Cookies
2 cups butter
24 oz. chocolate chips
4 cups  flour
2 cups brown sugar
2 tsp. soda
1 tsp.  salt
2 cups sugar
1 – 8 oz. Hershey Bar (grated)
5  cups blended oatmeal
4 eggs
2 tsp. baking powder
2 tsp.  vanilla
3 cups chopped nuts (your choice)

Measure oatmeal,  and blend in a blender to a fine powder. Cream the butter and both  sugars. Add eggs and vanilla, mix together with flour, oatmeal, salt,  baking powder, and soda. Add chocolate chips, Hershey Bar, and nuts. Roll into balls, and place two inches apart on a cookie  sheet.

Bake for 10 minutes at 375 degrees. Makes 112  cookies.