Yelly Eats

Chinese potsticker dumplings

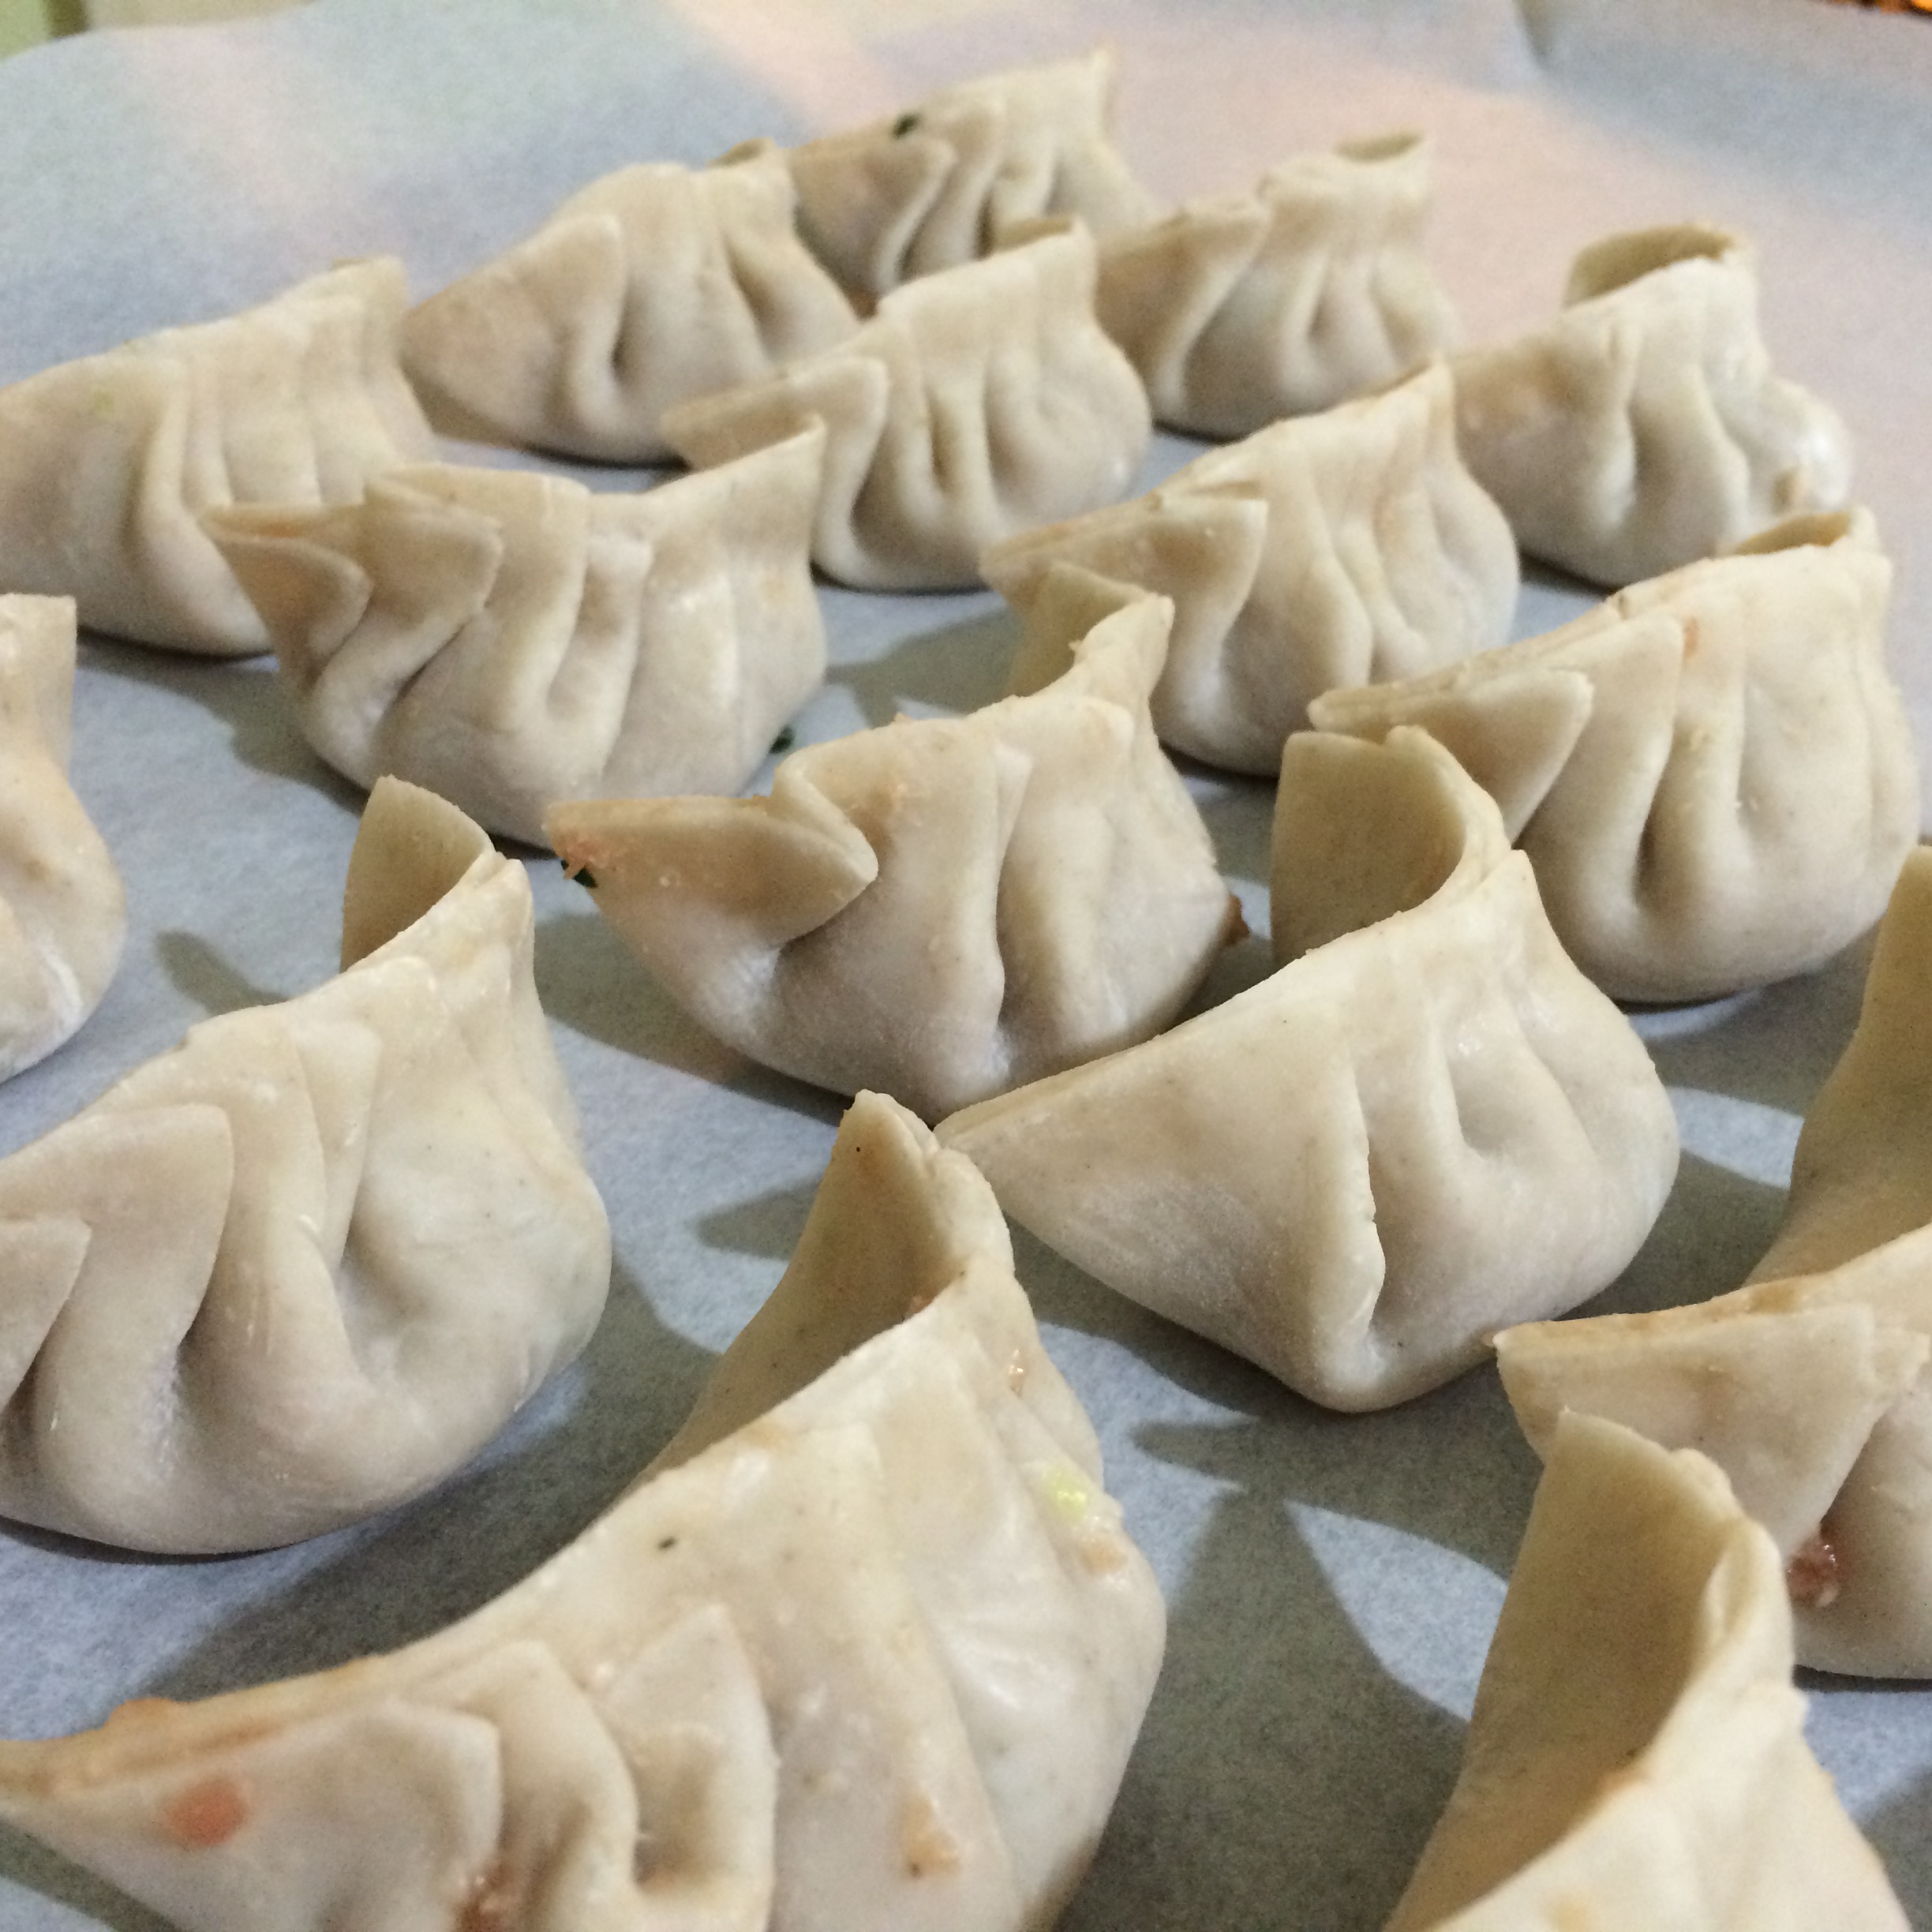
I’ve almost always bought the potstickers (which are similar to the Japanese gyoza), whether cooked and ready to eat or frozen.  I’ve never really made them myself.  Mostly because I thought the pleating would be a difficult thing to do.  I’m a perfectionist so anything that doesn’t look good to me is a disappointment (reminds me of the mini-melt down I had when I first made carrot cake whoopie pies.  It involved a quiet scream and the throwing of the poor, innocent ice cream scooper!).  To avoid the disappointment, I just don’t do things.

But lately, I’ve been fairly adventurous (helped along by Alan’s encouragement!).  Last week, I made siomai.  This weekend, it was Chinese pork potsticker dumplings.  I must have watched a lot of “how-to-pleat” videos on youtube to mentally prepare myself for the exercise.  The dumplings turned out really well and has (probably) been given the Alan seal of approval.  I used store bought dumpling wrappers – the next time I’m doing it, I’m doing EVERYTHING completely from scratch!

Ingredients:

  • 110g ground pork2015-02-21 19.00.12
  • 1 tsp fine sea salt
  • 1 tsp dark soy sauce
  • 1 tsp rice wine
  • 1 tsp sesame oil
  • 1 tsp sugar
  • ½ ground white pepper
  • 1 tbsp corn starch
  • 1 egg white
  • 1 clove garlic, grated
  • 1 tbsp freshly grated ginger
  • 1 heaping tbsp chives chopped finely
  • 18 dumpling wrappers

Directions:

  1. In a bowl, mix all the ingredients together until well incorporated.
  2. Taking a dumpling wrapper, dampen the edges of the dumpling wrapper.  Place 2 teaspoons of the mixture in the center of the wrapper, and holding the wrapper like a taco, start pleating the edges of the wrapper, pinching with each pleat to seal the dumpling well.  Place on a parchment paper-lined baking tray and set aside until ready to cook.
  3. My version of cooking the dumplings might be different from most people, but it works for me.  There are other ways, so feel free to cook them any other way that works for you.  I place water and vegetable oil in a wok (or shallow saucepan) and allow the water to heat up to a gentle rolling boil.  Place 6-8 dumplings in the boiling water and allow to boil covered for 5 minutes.  Uncover the dumplings and swirl (carefully) around to make sure that the dumplings aren’t sticking to the bottom of the pan.  Allow the water to evaporate and add a little oil to fry the dumplings until they’re golden brown.
  4. Serve with your favourite dip!

Chinese pork dumplings

Yelly Eats

Prawn toast

If you order Chinese takeaway, and order the hors d’oeuvres, you will most likely get prawn toast.  Apart from the spring rolls, this is probably one of my favourite things from a Chinese takeaway (I love prawns, you see).  I’ve always heard about how easy it is to make, but I could never wrap my mind around how the prawn would stick to the bread!

All week last week, I googled recipes for prawn toast and pored over directions.  I put together what I thought were common ingredients and hoped for the best!  Which was, in itself, such a dangerous thing to do since I had never (ever) made prawn toast!  But it worked and all night, as I was wallowing in prawn toast, I was thanking the cooking gods for smiling on my experimentation!

Ingredients:

  • 200g prawns, peeled and deveined
  • 2 spring onions (the white part only), chopped finely
  • ½ tsp salt
  • 1 tsp ground fresh ginger
  • 1 tablespoon cornflour
  • dash soy sauce
  • dash sesame oil
  • 1 egg white
  • 4 slices white bread (optional: crusts removed)
  • 500g sesame seed
  • 500ml vegetable oil for frying

Directions:

  1. In a food processor, add the prawns and the spring onions.  Blitz until a rough past is formed.  Turn the prawn paste out into a bowl.
  2. Add salt, cornflour, ginger, soy sauce, sesame oil, and egg white to the prawn paste and mix until well incorporated.  The mixture should feel like a heavy paste.
  3. Divide the paste into 4 portions.  Using a palette knife spread a quarter of the prawn paste onto a slice of white bread evenly.  Dip the filling side onto the sesame seeds making sure all the mixture is covered.
  4. Deep fry the toast in hot oil, filling side down first, until golden brown.  Flip over to brown the other side and drain on a absorbent paper and slice into quarters and serve.

Prawn toast


Yelly Eats

Chinese coconut tarts

I’ve loved coconut tarts since the first day I tasted them.  Alan properly introduced me to them in Chinatown in London.  We had a favourite Chinese bakery where we bought our char siu buns, cocktail buns and egg and coconut tarts.  We called this bakery, the one with the pushy aunts because they were very…authoritative.  To be honest, these Chinese aunties scared me!  We’ve since then changed loyalties and we’ve found the perfect char siu buns from somewhere else, but after looking through at least 4 Chinese bakeries, one of my favourite things to order is the coconut tart.  I love the flakiness of the pastry that they use on the tarts.

It is widely known that necessity is the mother of all invention.  The trains to London are (to put it indelicately) buggered on the weekends until 22 March.  So I can’t just zip into Chinatown and get some coconut tarts.  Plus, Alan has been asking me to bake coconut tarts for a few weeks now.  At first, they were very gentle, subtle hints.  A couple of weeks ago, he asked me to bake them because he said my tarts were better than the store bought ones because I put more coconut in them!  So, of course, I had to bake them!

Sliced coconut tart

I’ve almost always used store-bought puff pastry because it was more convenient.  But as I am challenging my baking fears, I’ve been practicing my puff and rough-puff pastry making capabilities and flexing my muscles.  I can bake shortcrust and sweet shortcrust pastry fairly well now, so this was a new challenge.

I think I’ve found a puff pastry recipe that I can manipulate and work to fit my needs.  I’ve done a few tweaks to it so that it’s simple and relatively fool proof.

Shortcrust pastry:

  • 250g butter, VERY COLD and cut into cubes
  • 250g all purpose flour
  • 50g icing sugar
  • 150ml cold water

Directions:

  1. Because my hands are a still a bit buggered, I’m using a mixer.  In a mixing bowl, combine flour and icing sugar. With the paddle attachment, add all the butter and mix.  You should still see pieces of butter but they should be covered in flour.
  2. Add 2/3 of the water and mix until the mixture comes together and comes away from the sides of the bowl.
  3. Turn the mixture out onto a floured surface and knead gently until the mixture is relatively smooth and then form a rectangle.  Using a floured rolling pin, roll into a longer rectangle.  Fold the top third down towards you and the bottom third up (you should have a square-ish rectangle).  Flour the surface some more so that the pastry doesn’t stick.  Hold one of the corners and turn the dough 90º and roll into a rectangle and fold into thirds again.  Do this another 2 times.  Then wrap in cling film and chill for 30 minutes.
  4. Roll and fold the pastry into thirds about 3 more times chilling 30 minute in between roll and fold sessions, wrapping the pastry after each time.  This will create the pastry layers.  Keep the pastry in the fridge until you’re ready to use it.  This will line at least 2 12-hole muffin pans (24 tarts), depending on how thick you want your pastry to be.

TIP:  To use this pastry in a savoury recipe, replace the sugar with 1 tsp fine sea salt.

When you’re ready to fill your tarts, roll out the pastry to desired thickness and cut rounds to line muffin tins.  Preheat the oven to 180ºC.

Coconut tart filling:

  • 225g dessicated coconutCoconut tarts before baking
  • 100g butter, softened
  • 175g sugar
  • 1 egg
  • 75g plain flour
  • 1 tsp baking powder
  • 100ml evaporated milk
  • 24 glacé cherry halves (optional)

Directions:

  1. In a bowl, combine coconut, flour and baking powder.  Set aside.  In another bowl, cream butter and sugar until light and fluffy.  Add the egg to the butter-sugar mixture until well combined.
  2. Add the coconut-flour mixture and evaporated milk until the mixture is thick.  It will be slightly heavy.
  3. Fill the tarts until almost to the top of the pastry (which is about one tablespoon of mixture) and top with half a glacé cherry (if you wish, this is optional of course, but it makes it so pretty!) and bake for 20-25 minutes (depending on how hot your oven is) or until risen over the pastry and golden brown.
  4. Take the tarts out of the oven and cool for 5 minutes before moving to wire racks to cool completely.

Coconut tarts


Yelly Eats

Curry in a hurry?

I have to write down the recipe for this curry that I made last week.  Because it is amazing and because I have this insatiable need to share!

Watch this space people!

Here’s a picture to whet your appetites!

Chicken curry

Yelly Eats

Pizza night!

There are benefits wanting to bake more savoury things.  I had a portion of gammon joint left in the freezer from New Year’s Day lunch and a can of pineapple rings lurking in my cupboard and fancied a pizza.  So off I went and made a pizza base from scratch!

Ingredients:

  • 300g strong bread flour
  • 1 teaspoon salt
  • 7g yeast
  • 1 tablespoon olive oil
  • 200g hot water

Directions:

I am using my trusty Kenwood Chef because my hands aren’t well today (oh the joy of recovering from carpal tunnel decompression surgery!) but this can be done by hand entirely!

In a bowl, place flour, yeast and salt (making sure the salt and yeast are on separate sides so that the salt doesn’t kill the yeast) and make a well in the middle.  In the well, place the oil and water and mix.  If using a mixer, on low speed, with a dough hook, mix the ingredients together.  When fairly combined, scrape the sides of the bowl and, still using the dough hook, mix the dough on medium speed for 5 minutes or until elastic and smooth.  The dough is going to be sticky so I add up to 3 heaping teaspoons of flour while the dough is kneaded.  If kneading by hand, on a floured surface, knead for about 10 minutes.  Turn the flour into a ball and cover with a tea towel and allow to rest for 30-45 minutes until the dough has risen.  You don’t really need to proof the dough if you’re making thin pizzas.

pizza dough

Preheat the oven to 220°C/200°C (fan).  Roll out the dough to your desired thickness (dough can be divided into 2 balls to make 2 10-inch thin crust pizzas).

desired thickness

Tip: I sprinkle a teaspoon of coarse semolina on the pan (which I line with baking parchment) so that the pizza dough doesn’t stick.  The semolina also adds an interesting texture to the dough.

semolina sprinkle

Top with whatever topping you wish.  I recommend using a pre-heated baking pan or a pizza stone if you have one for a crisper base.  Bake the pizza for 8-10 minutes until crisp.

topping favourites

When the timer buzzes, all you have to do is bring out the pizza, slice and enjoy!

pizza

Yelly Eats

Mama’s Braised Pork

Today, I was comfort cooking.  And desperate for more of that belly pork from Bobby Chinn’s House of Ho.  Unfortunately for me, London is an hour and a half away from train and I wasn’t particularly feeling well.  So I did the next best thing: cook my mom’s braised pork – and add a few tweaks of my own.

Braised pork

Ingredients:

  • 1kg pork belly
  • 3 tbsp vegetable oil
  • 50g sugar
  • 75ml soy sauce
  • 2 cinnamon bark
  • 20 cloves
  • 1 inch piece of ginger
  • 2 star anises
  • 3 tbsp xiao xing rice wine
  • enough water to cover the pork in a pan
  • 1 heaping tbsp of cornflour
  • 3-4 tablespoons of water to dissolve the cornflour in

Directions

  1. Score the belly pork rind.
  2. In a work or a deep sauce pan, heat up oil and add about 50g of sugar and slowly caramelise the sugar in the oi  Once the sugar has completely melted and has turned a brown caramelly colour, raise the heat to medium and lay the pork belly skin-side down down and allow to colour for about 3 minutes.  Turn to do the fleshy side for another 3 minutes.
  3. Fill the pan until  with enough water to cover the pork.  Add the soy sauce, ginger, cinnamon, star anise, cloves and rice wine. 
  4. Braise for 1 1/2 hrs turning every 30 minutes.  Then remove the pork from the braising liquid and place the pork in a lined roasting tin
  5. Preheat the oven to 200°C.  Pass the braising liquid through a sieve.  To the braising liquid add 1 heaped tbsp of cornflour (don’t add the cornflour directly to the hot liquid – dissolve it first in about 3 tablespoons of water) and stir over low heat and allow to thicken.
  6. Pour half of the thickened braising liquid over the pork and roast in the oven for 30 minutes.  After roasting, take the pork out of the oven and allow to rest for 10 minutes before slicing to serve.   Serve with chopped spring onions sprinkled over the pork slices.
  7. This is best served with rice or hirata buns The left over thickened sauce can be a dipping sauce for the buns or sauce for the rice. 

Braised Chinese Pork

Yelly Eats

Chocolate Guinness cupcakes!

Finally!!!

I was feeling a bit stressed out because the days were rushing past me and I hadn’t started on the Cake Book Challenge yet.  I had only 25 weeks to accomplish this goal to begin with!  But finally, the Cake Book challenge has officially begun!

1 recipe down, 49 more to go!  23.5 weeks left!

I chose to start with the Chocolate Guinness cupcakes recipe (page 44 of the book) because I love Chocolate Guinness cake.  The recipe was similar to my favourite choccie Guinness cake recipe (the Hummingbird Bakery recipe is ace and is a great go-to cake) so it wasn’t going to stress me out.  Plus, I get to drink the left over Guinness (which I did!)!

Chocolate Guiness cupcake recipe

One thing I did realise is that my hands are horrible and I have no icing talent!  The hands were wobbly and I couldn’t control the piping bag as well as I would’ve wanted to.  Also, attempting to ice anything with cream cheese frosting in this heat is generally a silly idea.  The minute I’d finished icing the cupcake, I could see the frosting softening ever so slightly!  I think the necessary tweak would be to add more icing sugar.  Maybe!  I may scrape off all the icing and start over again!

Maybe.

Chocolate Guinness cupcakes

I will be making Carly’s holiday cake today as well (I am hoping to accomplish this with all the good will and positive thinking in the world!).  Today’s baking mantra: I will manage my time properly!

Yelly Eats

Beetroot brownies

I bring this brownie to work all the time and, more often than not, the brownies go, within minutes.  Sometimes people are taken aback at the “beetroot” element of the brownie and  I always say that this is a “healthy” brownie and I always joke that beetroot that’s in it can count towards one of your five-a-day.  But there is a large element of truth in that statement because there is a considerable amount of beetroot in the recipe — and beetroot is a vegetable!  I know that most people are pleasantly surprised at how good the brownies taste.  I think they expect the traditional beetroot taste to hit them, but in this recipe, you can’t really taste the beetroot.  If anything, the beetroot enhances the taste of the chocolate.

I tweaked a recipe that I found in a supermarket’s magazine.  I added more beetroot and reduced the amount of sugar in it.  The brownies come out very moist and very fudgy.

Ingredients:

  • 200g dark chocolateBeetroot brownies
  • 200g butter
  • 3 eggs
  • 1 teaspoon vanilla
  • 250g sugar
  • 200g self-raising flour
  • 300g vacuum packed cooked beetroot, grated

Directions:

  1. Break the chocolate into sections and together with the butter, place in a heatproof dish and stand over a pan of simmering water, making sure that the bottom of the bowl didn’t touch the water.  Leave to allow the chocolate and butter to melt, stirring occasionally.  Once the chocolate and butter are melted, set aside and allow to cool.
  2. Preheat oven to 180C.
  3. In a bowl, mix together eggs, vanilla and sugar.  Beat until the eggs are light yellow in colour.  Beat in the melted chocolate until well-combined.  The mixture will thicken slightly as you mix the chocolate into the egg and sugar mixture.  Gently fold in the flour and beetroot..
  4. Spoon the mixture into a prepared pan (greased and lined with parchment paper) and bake for 40-45 minutes.  It is done when a toothpick inserted comes out relatively clean.  Cool in the pan for about 5 minutes and then remove from the baking tin and cool completely on a wire rack.
  5. Will make 16-24 squares, depending on how big you slice your squares.
Yelly Eats

Salt and chilli belly pork

I used to buy salt and chilli belly pork from the supermarket prepacked.  The pork was lovely, and the flavours were simple, uncomplicated and delicious.  There is nothing more enjoyable than straightforward goodness.  I looked at the ingredients list one evening and thought I could actually make the ingredient list a bit simpler.  The taste reminded me of rotisserie pork that was readily available in the Philippines, so I started from there.  Salt and pepper were the mainstays of this lovely Filipino “fast food” option.

There are only 5 ingredients to this lovely no-fail recipe.  Of course you can change the herb of choice added (I’ve tried dill and it works!), remove the chilli and replace it with just pepper, add soy sauce instead of salt…the permutations can go on forever!  Feel free to customise this recipe according to your tastes!  The beauty of this is that you can make it ahead of time and just store it in the fridge and take it out when you’re ready to cook it.

Enjoy!

Ingredients:Salt and chilli pork belly

  • 500g pork belly strips, rind removed
  • 1 heaping teaspoon salt
  • 1 teaspoon dried parsley
  • 1-2 teaspoons chilli flakes (depending on how spicy you want it)
  • 3-4 tablespoons vegetable oil

Directions:

  1. Mix salt, spices and oil together in ziplock lock bag (other brands of resealable bags are acceptable!).  Add the belly pork slices and marinade for at least 2 hours, even better if marinated overnight.
  2. Preheat oven to 200C.
  3. Line a baking tin with parchment paper and lay the belly pork slices.  Place in the middle of the oven.  Bake the belly pork slices for 30 minutes, turning the belly pork slices halfway.
  4. The belly pork slices will come out lovely and brown.  Cut into bite-sized chunks and serve.
  5. This is great with rice and greens — or if you’re watching carbs like me, just greens (like wilted kale or cabbage, or steamed pak choi or choi sum).

Salt and chilli pork with greens

Yelly Eats

Pecan and chocolate banana spice muffins

I’ve been looking back at the first 53 days of the year, I haven’t really baked much.

So the first bake for 2014 is banana muffins.  I love banana loaves and treasure my banana bread recipes.  My favourites are those that translate into wonderful muffins.  Most cake recipes will be great cupcake or muffin recipes anyway, with a little ingredient tweaking and oven watching as cupcakes and muffins, obviously are smaller and will bake quicker.  I’m sharing another one of those “tweaked” recipes.  This recipe happened because I was a little too enthusiastic with random inclusion of ingredients.  I was a bit worried about how the spices would work with the dark chocolate, but according to my lovely taste-testers at work, the chocolate studded spiced mixture works!  Hurrah!

Now, if you’re brave enough to give my little concoction a try, here’s the recipe!  What’s great about this recipe is it’s a little lighter because I don’t use butter but vegetable oil.  This also makes exactly 12, count em, 12 regular sized cupcakes.

Ingredients

  • 220g plain flour
  • 1 teaspoon baking powderPecan and choccie banana spice muffin
  • 1 teaspoon baking soda
  • ½ teaspoon salt
  • 2 teaspoons ground cinnamon
  • 1 teaspoon ground cloves
  • 3 bananas (preferrably at least medium sized), mashed
  • 100g chocolate chips
  • 150 g chopped pecans
  • 150g caster sugar
  • 1 egg
  • 1 teaspoon vanilla extract
  • 75ml vegetable oil

Directions:

  1. Preheat oven to 190°C (180°C fan).
  2. In a bowl, mix flour, baking powder, baking soda, cinnamon, cloves and salt together and set aside.
  3. In a mixing bowl, mix oil, sugar, eggs, vanilla and the mashed banana together until the mixture is smooth.  I love my mixer (my nearly 3-year old Kenwood Chef) because I can just bung everything in (including unmashed bananas! the lovely machine does it all for me!) and it gets mixed beautifully!  Add the chocolate chips, pecans and the flour mixture and mix until well-incorporated, scraping the sides of the mixing bowls occasionally.
  4. Spoon the mixture into a muffin tin lined with muffin cases.  For more evenly sized cupcakes, I use an ice cream scooper.  Bake for 18-20 minutes.  The muffins will be ready when a toothpick inserted in the centre comes out clean.
  5. Take the muffins out of the oven and leave to rest in the muffin tray for 5 minutes before letting them cool completely on a wire rack.
  6. Makes 12-14 muffins, depending on the size of cupcake cases that you use.