Yelly Eats

Prawn toast

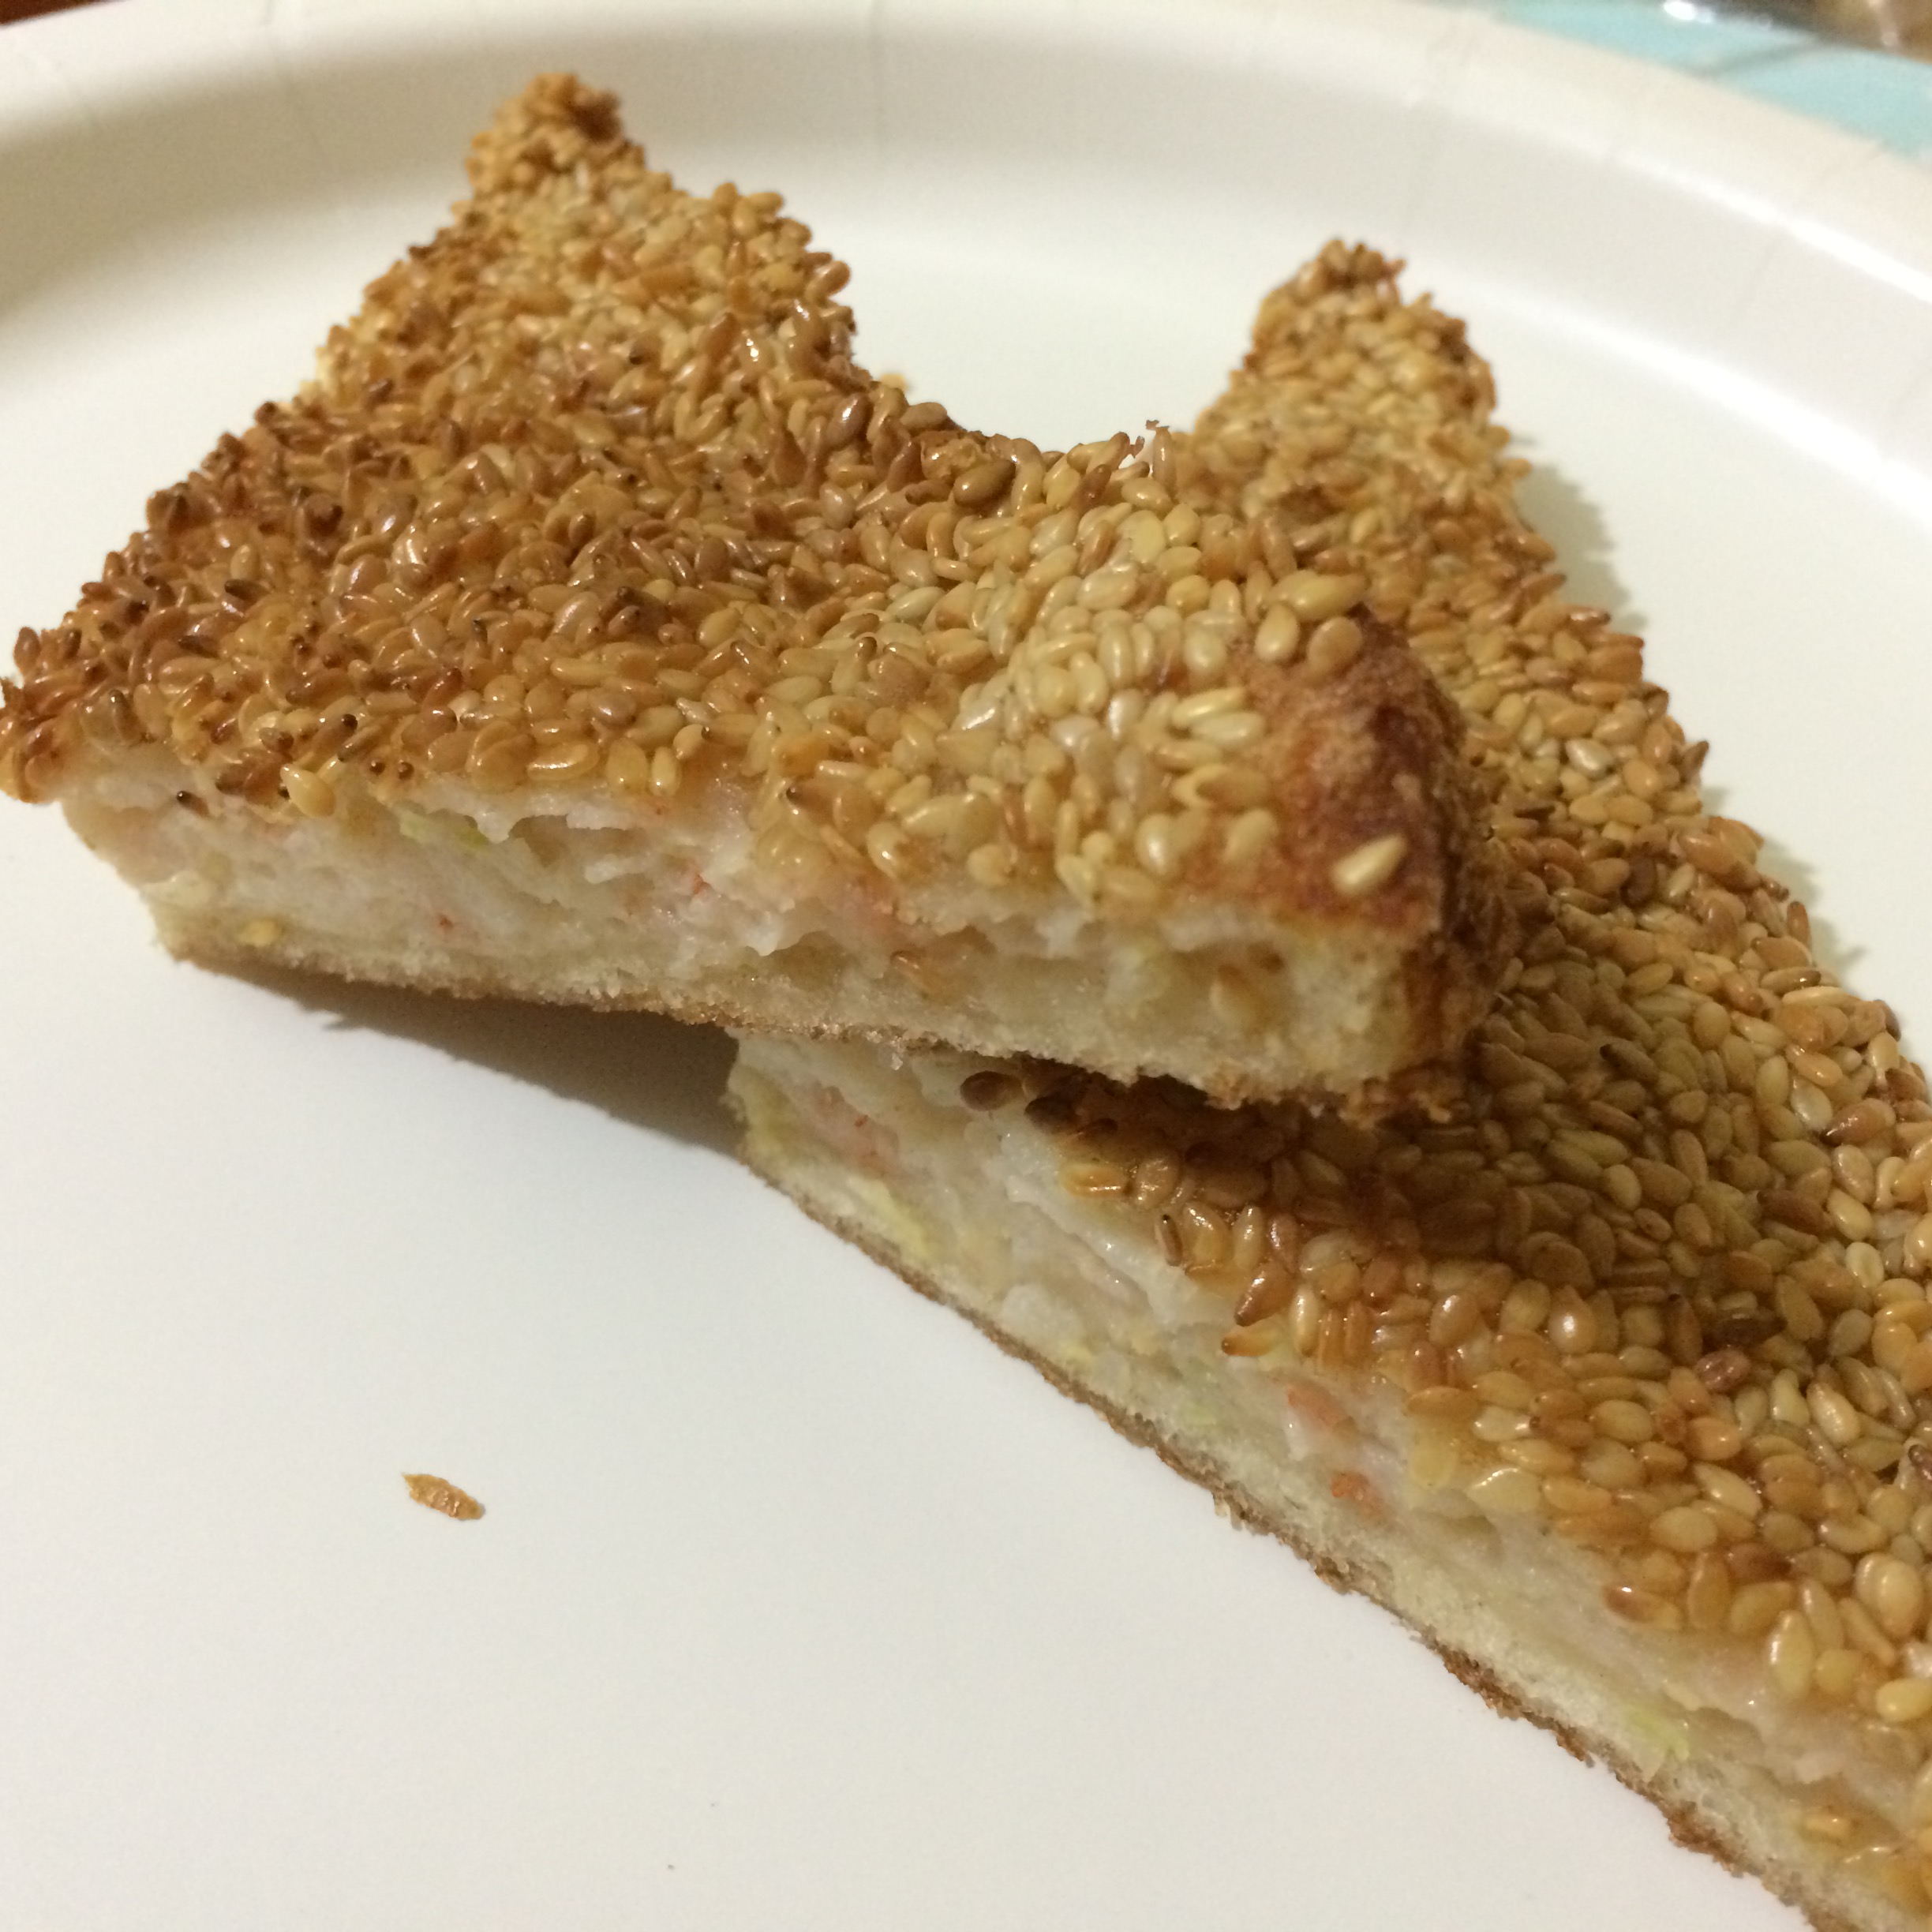
If you order Chinese takeaway, and order the hors d’oeuvres, you will most likely get prawn toast.  Apart from the spring rolls, this is probably one of my favourite things from a Chinese takeaway (I love prawns, you see).  I’ve always heard about how easy it is to make, but I could never wrap my mind around how the prawn would stick to the bread!

All week last week, I googled recipes for prawn toast and pored over directions.  I put together what I thought were common ingredients and hoped for the best!  Which was, in itself, such a dangerous thing to do since I had never (ever) made prawn toast!  But it worked and all night, as I was wallowing in prawn toast, I was thanking the cooking gods for smiling on my experimentation!

Ingredients:

  • 200g prawns, peeled and deveined
  • 2 spring onions (the white part only), chopped finely
  • ½ tsp salt
  • 1 tsp ground fresh ginger
  • 1 tablespoon cornflour
  • dash soy sauce
  • dash sesame oil
  • 1 egg white
  • 4 slices white bread (optional: crusts removed)
  • 500g sesame seed
  • 500ml vegetable oil for frying

Directions:

  1. In a food processor, add the prawns and the spring onions.  Blitz until a rough past is formed.  Turn the prawn paste out into a bowl.
  2. Add salt, cornflour, ginger, soy sauce, sesame oil, and egg white to the prawn paste and mix until well incorporated.  The mixture should feel like a heavy paste.
  3. Divide the paste into 4 portions.  Using a palette knife spread a quarter of the prawn paste onto a slice of white bread evenly.  Dip the filling side onto the sesame seeds making sure all the mixture is covered.
  4. Deep fry the toast in hot oil, filling side down first, until golden brown.  Flip over to brown the other side and drain on a absorbent paper and slice into quarters and serve.

Prawn toast


Yelly Eats

Curry in a hurry?

I have to write down the recipe for this curry that I made last week.  Because it is amazing and because I have this insatiable need to share!

Watch this space people!

Here’s a picture to whet your appetites!

Chicken curry

Yelly Eats

Crispy belly pork!

One of my favourite Chinese restaurant dishes, probably of all time, is crispy belly pork.  I’ve seen fairly complicated ways of preparing it.  I’ve heard someone say that you had to hold up the piece of belly pork and bathe the skin side with heated oil.  Another version said you bathed it with boiling water.  All these instructions sort of turned me off even attempting to make crispy belly pork.

Mind you, I made a fairly good roasted pork joint and made amazing crackling, if I do say so myself!  It’s very simple.  Take a pork shoulder joint, pre-heat oven to 200 ºC, score the skin, rub salt and pepper and pop it into the oven for at least 1 hour and 45 minutes.  To make perfect crackling (and this is faffing about really, but the crackling turns out so crackingly beautiful and that makes the faffing about absolutely worth it!), after cooking the pork, take off the skin and cook for a further 30 minutes at about 220 ºC.  Considering my success with roasting pork and making crackling successfully, you’d think I wouldn’t be afraid of making crispy belly pork.  But I’ve had really good crispy belly pork from my favourite Chinese and I didn’t want to make it and be disappointed in something I’d prepared!

A few weeks ago, one of my friends shared a Youtube video with me.  I share a lot of my baking photos on Facebook so people know I love to bake.  Cecile, my friend from Manila, said I should take a break from baking sweet things and attempt the belly pork recipe.  I watched the video maybe 5 times to work up the courage to attempt it.  But attempt it, I did.

I followed the video instructions but used a Stanley knife to score the skin instead of using skewers.  Also, I found that when I first checked on the skin it wasn’t crispy enough so I cooked it for a further 25 minutes.  The skin came out so well that I had to record for posterity how crispy it was.  I posted the video on Instagram because I was really pleased with myself!

Crispy belly pork on rice with pak choi

Yelly Eats

Baking pan de sal!

The pan de sal is ubiquitous (HUGE word alert!) in the Philippines.  It is sold in every corner bakery, in every panaderia, in various shapes and sizes.  It is bread that has been enjoyed in the Philippines for centuries, as apparently, it was introduced by the Spanish conquistadores in the 16th century.

Since moving to the UK, I have been looking for a British equivalent and there have been near misses, but not quite like the real thing.  Pan de sal, when translated from Spanish, means salt bread.  Funnily, it is more sweet than savoury.   I wrote about baking pan de sal last year and since then I’ve been trying out various recipes from online sources.  Now, though, I can finally say that I’ve perfected my version of the Philippine bread staple.  I’ve tried several recipes and have now found that putting the recipes together in a system that works for me does really work.  Here’s my take on the pan de sal:

Ingredients:

  • 500g strong bread flour (can also be substituted with whole wheat or gluten-free flour)
  • 1 teaspoon baking powder
  • 1 teaspoon salt
  • 75g butter
  • 150ml milk (full fat, semi-skimmed or skim milk)
  • 70g sugar
  • 1 packet active dry yeast (or 7g)
  • 1 egg
  • 15ml vegetable oil
  • 1 cup bread crumbs (or dry polenta/corn meal)

Directions:

  1. In a mixing bowl, combine the flour, baking powder and salt.  Mix until well combined (I use a balloon whisk to do this because I find that this mixes the ingredients quickly) and set aside.
  2. In a sauce pan, heat the milk over low heat.  Add the butter and sugar and mix until the butter and sugar are melted.  Remove from the heat and allow to cool until lukewarm in temperature.  Once lukewarm, add the yeast and stir until the yeast is dissolved into the milk mixture.
  3. Add the egg and oil to the flour mixture and mix well.  Mix the milk and butter mixture with the flour until a wet dough forms.
  4. Turn out the dough onto a floured surface and knead until the dough is smooth and elastic.  If you’re kneading by hand, this should take about 8-10 minutes.  Steps 3 and 4 can be done in a free-standing mixer with a dough hook attachment with step 3 in the lowest speed setting and turning up the mixer to the next speed to add the butter and milk mixture and knead the dough for about 5 minutes.
  5. Place the dough in an oiled bowl and allow to proof for an hour or until the dough has risen to double its size.
  6. After proofing, punch the dough to deflate it and turn it out onto a floured surface.  Knead the dough by hand for 5 minutes then form it into a ball.  Cut the dough in half using a pastry cutter or a knife.  Form the dough pieces into a ball and repeat until you have 8 dough balls.  Once you have 8 dough balls, cut each in half and roll in bread crumbs.  This makes 16 large rolls but the recipe can make up to 20 rolls.
  7. Line a baking pan with parchment paper and place the dough pieces cut side up on the pan.  Allow for enough space for the dough ball halves to expand.  Allow to proof for another hour or until it doubles in size.
  8. Preheat the oven to 190ºC (375ºF).  If using a fan oven preheat to about 160ºC (320ºF).  Place the baking pan in the oven and bake the dough for 15 minutes.

Pan de sal

Yelly Eats

Fig squares

I’ve been under the weather for quite a while and it’s been a very difficult week.  I was admitted to hospital overnight on Monday night for observation.  But they didn’t find anything, so that, in itself, is a relief.  I still have my headache though, which is a bit worrying.

My favourite thing to do when trying to comfort myself is baking.  Sometimes how I feel affects my baking results, but more often than not, I find comfort in the baking process.  I felt the need to bake yesterday and I had dried figs in my cupboard that needed using.  I intended to use the dried figs to make fig bars ala Fig Newtons but I wasn’t sure if I had all the ingredients.  So my fig squares were born.

They are lovely and squidgy and crumbly at the same time.  They remind me slightly of Fig Newtons which made me excited to go home because I’m sure my mum would love them (she absolutely loves Fig Newtons!).

I’m being very careful with my sugars so I’ve only had one tiny piece (yes, really) of the fig squares.  But I’m happy to share the love, so here’s the recipe!

Ingredients:

  • 150g all purpose flour
  • 1 teaspoon baking powder
  • 1/4 teaspoon salt
  • 2 eggs
  • 175g brown sugar
  • 125g unsalted butter, softened
  • 250g dried figs, chopped

Directions:

  1. Preheat the oven to 170°C.
  2. In a mixing bowl, mix flour, salt and baking powder together with a balloon whisk until well combined.
  3. In separate a mixing bowl (am using a free standing mixer but you can also do this by hand with a balloon whisk), combine softened butter and sugars and beat until the mixture is smooth and fluffy (about 4 minutes by mixer and about 7-10 minutes if beating by hand).  Add the eggs one at a time, making sure that the egg is well-combined before adding the next one.  Add the flour mixture in quarters.  It will look like you don’t have enough batter but it will be fine, I promise!  Add the chopped figs and mix until everything is well-distributed.
  4. Spread mixture in a greased 17.5cm x 26.5cm (or thereabouts) pan lined with baking parchment (I learned that lining the baking pan with parchment is good because it makes it easy to release the cake from the pan) and bake for 30-35 minutes or until a toothpick inserted comes out clean.  This recipe makes up to 24 squares.

This recipe will also work with prunes, dates and raisins.  If using raisins, it would be best to soak the same amount in about 75ml of water overnight until the raisins are plumped up.  If you want a boozy version of the fruit squares, soak the fruit in about 30ml of either brandy or rum and add the fruit (with the brandy or rum) to the mixture.

Figbars

Yelly Eats

Love my Mango Love!

Over a month ago, I saw an advert on The Stylist magazine about a cupcake competition.  The instructions were to create a cupcake made of a sponge cake base, frosting and decoration.  The prize was what attracted me the most: if you were in the top 5 finalists, you won a Kitchenaid artisan mixer, a copy of the new Hummingbird Bakery cookbook and the chance to attend a baking masterclass.  If you won, your cupcake would be sold in all the Hummingbird Bakery branches for 2 whole months.  To be honest, it was mostly the masterclass that I wanted to attend.  I wanted to attend classes so that I could improve my cupcake decorating skills.  They also said that you would learn baking skills at the masterclass and I was definitely up for that!  Any chance at increasing what I know about baking was a chance worth taking.  I already have a Kenwood chef so getting a Kitchenaid mixer would have been a wonderful bonus.

It was a cupcake challenge and I was definitely challenged!

I sat down and started reading up on flavours and looked at recipes.  I checked my baking notes and set about improving a cupcake recipe I already had.  I also knew that I had to create a flavour profile that was consistent with every bake.  So I tested and retested the recipe I had in my head and when I was happy with how the sponge tasted, I set about creating the frosting.  And slowly but surely, the cupcake that I imagined became not only an idea but a real, live cupcake!

I suppose I couldn’t have won the cupcake challenge because the brief was for the cupcake to embody Hummingbird Bakery’s American roots.  I think I was missing the Philippines and missing Philippine mangoes too much that it came out in the cupcake I created!  I called my cupcake Mango Love.  I said that the cupcake gave you a burst of tropical mango sunshine.  And it did!

I’m grateful for the experience, because it’s made me trust my baking instincts more.  I’m more confident about my baking and I know that my goal is now to constantly improve my baking.  This whole experience of putting together recipes and making sure the flavours were sound has encouraged me even more to bake and create.  I’m thankful to Hummingbird Bakery and to Emerald Street for issuing the challenge.  Even thought I didn’t win, when I look at the pictures I took of the cupcakes that I made, I still feel like, somehow, I won a prize.

The recipe will be up on the blog in the next few days! 🙂

Mango Love cupcakes

Yelly Eats

Pork shanks for dinner

There is a Filipino dish called humba (hoom-ba) which I absolutely love.  My mum used to make it on Saturdays because my dad was teaching and would be away.  My dad is Jewish so we try to avoid eating pork when he is at home.  Because he teaches at graduate school on Saturdays and is away for most of the day, Saturday would be pork day.  My mum makes the most amazing pork chops and just thinking about them now is making my tummy rumble!

I am pleased to say that I can now cook humba and it’s a favourite because the cut of pork is one of the cheapest.  I love buying pork hocks and pork shanks because they’re so cheap and you get so much meat from them.  Humba has dried banana blossoms which can be purloined from oriental supermarkets.  When I cook humba I am transported to the Philippines and I am once again in my mum’s kitchen waiting for her to put the humba on the table (although I must say that my mum’s humba is still the best and my version of it pales in comparison!).

I went to the supermarket yesterday and found pork shanks.  I am someone who can’t resist a food bargain so I bought the pork shanks thinking I had banana blossoms at home.  I thought I was due another humba session.  But as I inspected my cupboard, I discovered that it didn’t have the banana blossoms that I thought were languishing behind cans of chopped tomatoes.  So after a little creative thinking, I thought if I cooked the pork shanks in tomatoes, it would work.  So I brought down a couple of cans of chopped tomatoes, I chopped onions, brought out the frozen chopped garlic, hunted my dried bay leaves down, and chopped up what was salvageable from the celery that I bought nearly 2 weeks ago!

I had my fingers crossed for how my little concoction would turn out and I was quite pleased at the flavour.  The base flavour was based on a Filipino dish called afritada which starts with sautéeing garlic, onions and tomatoes.  Because the pork was cooked slowly, the pork was meltingly soft.  Good things come to those who wait and slow cooking this was definitely worth the wait!  It was great served over couscous but would be great over rice or mashed potatoes too!  If you fancy trying the recipe, here it is:

Ingredients:pork shanks1

  • 1kg pork shanks (not deboned)
  • 2 400g cans of chopped tomatoes
  • 1 large onion chopped
  • 3 celery stalks chopped
  • 2 heaped teaspoons of chopped garlic
  • 2 dried bay leaves
  • ½ teaspoon paprika
  • ½ teaspoon cumin
  • 500-750 ml water
  • 1 pork broth cube
  • salt and pepper to taste
  • 1 tablespoon olive oil

Directions:

  1. In a large stock pot, heat the oil and sautee onions.  When the onions are slightly transluscent, add the chopped tomatoes, garlic, celery, broth cube, spices and the bay leaves.  Allow to simmer.
  2. Add the pork shanks and enough water to cover the pork shanks.  Cover and cook on low heat for 1 hour, turning pork shanks occasionally so that the skin doesn’t catch on the stock pot bottom.
  3. When the meat is soft enough, take the shanks out of the pot and debone them and return the meat pieces into the tomato sauce and cook for a further hour on low heat.  The deboning is optional but it will make it easier to eat later on and you can remove the skin if you want to make it less fatty.   Add salt and pepper to taste.
  4. When you are ready to serve, you can opt to slice the pork pieces into bite sized pieces.

pork shanks2


Yelly Eats

Ube!

I’m working on an ube sponge cake recipe because I miss ube cake from the Philippines.  I particularly love the ube cake from Red Ribbon.  But because Red Ribbon hasn’t made it to this side of the Atlantic, I will just have to learn to make the cake myself.  I’ve always said that necessity is the mother of invention and it is absolutely necessary for me to have my ube cake fix!  I haven’t had a slice of ube cake since…I can’t remember.  It must have been over 5 years!

My first attempt seemed to go down pretty well.  The colour was great and the flavour was absolutely there.  The cake was spongy and light.

purple yam cake batter

I will have to make it again maybe next week (after the cake that’s currently residing in my cake box has been consumed).  I’ve got recipe improvements in my head already.  I’m sure the oriental store in Chelmsford will enjoy the fact that I’ll be buying another jar of ube jam next week!  Watch this space for the recipe soon!

Ube cake at last!


Yelly Eats

Testing 1-2-3

I’ve been working on a muffin base recipe.  I’m almost there I think, because the series of banana muffins that I’ve been baking seems to turn out the same way each time now and they all look the same.  The next step is to try another fruit and then ask my friends to try the recipe to see if it works for them in the same way!

After I perfect the muffin recipe, I’m going to work on a cupcake base recipe next!