Yelly Eats

Mango and sago pudding

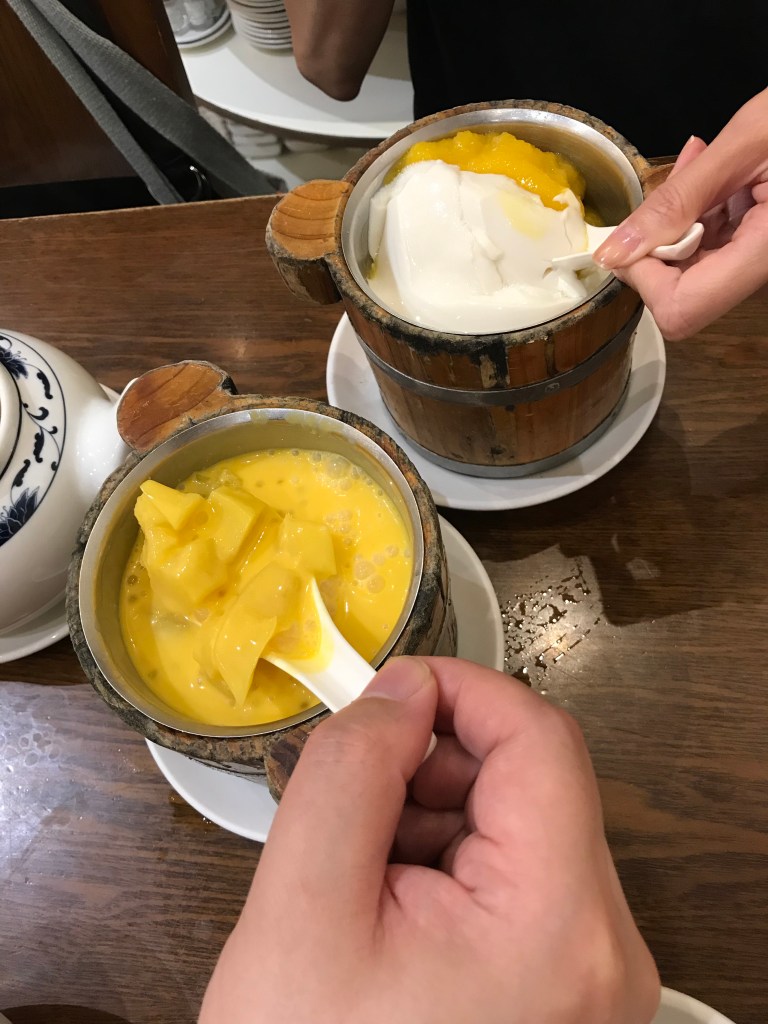
This dessert is mostly Chinese, or more specifically, Taiwanese, I think. Alan and I first had this at Cafe TPT in Chinatown in London. At the time, I could still have grapefruit, so the variant we got was mango, grapefruit, tofu and sago. It was so yummy! Cafe TPT has quite an extensive dessert menu and I think one day, I’m going to have to just go and have all the cold desserts! It’s well worth the trip!

This dessert is so simple but so yummy. It’s basically mango pulp with sweet bean curd and sago. I love the bean curd because it’s silken texture reminds me of taho (I think it actually is taho!)- a silken fresh soy bean curd street food that most Filipinos will have at breakfast.

But because going to London involves a 90-minute train journey from Harwich to Liverpool Street station, and then a 20-minute tube ride (with at least 1 change), I told myself that it was necessary for me to learn how to make a version of this that I was happy to eat to tide me over in between London Chinatown visits. I’ve made this several times now and am happy with the result each time, so I’m finally happy to share this with you.

Ingredients:

  • 1 850g can of mango pulp (or you can blitz up the same amount of mango flesh — use ripe Pakistan or Alfonso mangoes, or if you’re lucky enough to live in Southeast Asia, ripe mangoes)
  • 100g mini sago cooked according to instructions
  • 2 247g cans of peach slices (don’t use canned mangoes, better to use fresh if you can)
  • 1 410g can of evaporated milk
  • 2 349g packs of silken tofu diced.

It’s so easy to put together. First drain the juice from the canned peaches. Then in a appropriately sized container, mix the mango pulp and the evaporated milk. i don’t usually feel the need to add any sugar because I find that the mango pulp is already sweet enough. However, if you are using freshly made mango pulp, it might be necessary to switch the evaporated milk with condensed milk, or if you don’t want it to be too rich, use sugar to sweeten. Add the drained peach slices and gently fold in the tofu cubes. As the sago will absorb as much liquid as it possibly can, I usually store them in cold water in a separate container. I spoon the appropriate amount of sago in the bottom of my dessert bowl and top it with the mango pulp-peach-tofu mixture.

Et voila! Now you can enjoy mango sago pudding as much as you want at home.

Let me know if you try the recipe and let me know what you think! I’d love to hear from you!

Yelly Eats

Baked Figs

Figs are my fruit du jour.

My favourite dessert at the moment is baked figs with Greek yogurt and honey.  It’s a quick, comforting dessert.  And very easy to prepare: cut the figs into quarters and roll them in sugar.  Then place them in a baking pan and bake them at 200°C for 20 minutes.  Serve with yogurt and honey.  Figs will give out a syrupy juice so make sure you spoon the syrup onto the yogurt too.  Makes for a very tasty dessert!

Yelly Eats

Carrot cake!

I found something wonderful in the supermarket!  Shredded carrots!  And when there are shredded carrots available, a carrot cake will be baked!  Anything to save my hands from doing the grunt work!

The recipe needs perfecting and I may have to work on adjusting the measurements as this makes a VERY big cake.  But the cake has turned out pretty well!  I’m bringing this to work tomorrow to share it with my coworkers so I can get feedback!


Yelly Eats

Pistachio, coconut and cardamom burfis

We’re having a curry lunch at work tomorrow and we’ve been asked by the work colleague hosting the curry lunch to bring anything that we think will go with curry.   I’ve decided to bring roti bread (shop bought as I haven’t learned how to make them yet!) and pistachio, coconut and cardamom burfis.

I’ve always liked Indian food, but I must say that I’ve never really had proper Indian food until I moved to the UK.  One of the consultants who used to work for the government corporation I used to work for in the Philippines used to bring us Indian-inspired dishes and she introduced me to roti bread which I am now in love with!

Anyway, apart from the adorable roti bread,  I’m bringing pistachio annd coconut burfis to work tomorrow.  A burfi (or barfi or burfee, or borfee) is a sweet confectionery from India.  It is usually made with condensed milk cooked with sugar until it solidifies.  I saw this version being made about 5 or 6 years ago on a food-related channel on the Discovery Travel and Adventure channel.  It wasn’t until about 4 years ago, when I moved to England, funnily enough, that I had the opportunity to try making this recipe.  On the programme I was watching, it looked easy to make, and it was—very, VERY easy to make.  Most burfis ask for the condensed milk to be cooked in sugar until they harden, but as I am diabetic (and very lazy), I thought I’d try it without the long cooking process and the added sugar.  The condensed milk is sweet enough!

Here’s my recipe:

Ingredients:

  • 250 grams dessicated coconut
  • 200 grams shelled pistachio ones (avoid the salted pistachios)
  • 10 cardamom pods
  • 350ml sweetened condensed milk

Directions:

  1. In a small food processor, roughly chop the pistachios until they resemble small shards.  The chopped pistachios don’t have to be too processed because you do want to be able to bite into the occasional chunky piece of pistachio.
  2. Remove the seeds from the cardamom pods and, using a mortar and pestle, grind the seeds into a fine powder.  I find this particular part of the preparation very therapeutic!
  3. In a large bowl, combine the 200 grams of the dessicated coconut (reserve 50 grams to roll the burfis in later), the chopped pistachios, the ground cardamom seeds and the condensed milk.  Mix until everything is well combined.
  4. With lightly oiled hands (because the condensed milk is very sticky!), scoop enough of the pistachio-condensed milk-coconut mixture to make a ball that’s about 1inch in diameter.  Once the balls are formed, roll them in the dessicated coconut you reserved.  Place on a plate or box to store.


The burfis can be eaten as soon as they are made but it’s much nicer if you refrigerate them for at least 2 hours before you serve.  These keep in the fridge for about a week.  Although, I very much doubt that they’ll last that long as they’re very moreish (moreish, or more-ish, is a word I learnedafter moving to England.  It means causing one to want more–usually food!)!

Yelly Eats

Banana cupcake

I was craving a banana cupcake (with peanut butter!) and, as luck would have it, I had just enough bananas to make up a batch of 12 cupcakes!

Sometimes, it’s the simple things that make me really happy.  And sometimes, it’s just a banana cupcake!

It’s the easiest cupcake recipe that makes the moistest of cupcakes!

Ingredients:

  • 180g of plain flourBanana Cupcake
  • 1 teaspoon baking powder
  • 1 teaspoon of baking soda
  • ½ teaspoon salt
  • 3 ripe bananas, mashed
  • 150g light brown sugar
  • 1 egg
  • 75ml vegetable oil (or softened butter if you want a more luxurious treat)

Directions

  1. Preheat oven to 190°C (180°C for fan ovens).
  2. Combine flour, baking powder, baking soda and salt in a bowl and mix with a balloon whisk.  If you’re making a Christmas version of this recipe, you can add 1 teaspoon of cinnamon and ½ teaspoon of nutmeg.
  3. In a separate bowl, mix oil and sugar.  Mix until sugar granules appear to be smaller.  Add the egg and mix until the mixture is smooth.  Add the flour mixture in thirds.
  4. Mix in mashed bananas and stir until mashed bananas are well-distributed.  Scoop into a muffin pan lined with cupcake cases.
  5. Bake for 18-20 minutes.  The cupcakes are completely cooked when a toothpick is inserted in the centre of a cupcake and it comes out clean.
  6. Makes 12 cupcakes exactly.  I use an ice cream scooper to distribute the batter equally.
Yelly Eats

Christmas Bread and Butter Pudding

For anyone with surplus mince pie filling, this would be a great option.

3 eggs
280 ml cream
55 ml milk
1 teaspoon vanilla extract
50 grams granulated sugar
100 grams mince pie filling
50 g butter (preferably unsalted)
1 loaf brioche bread (or any sweet bread)

  • Preheat oven to 180C.
  • Beat eggs well with a ballon wire whisk.  Add sugar and beat well until sugar is well incorporated (tip: the lighter the colour of the egg-sugar mixture, the better).  Add the cream and vanilla and whisk well.  Set aside.
  • Slice brioche loaf into 16 slices.  This should form 8 pairs.  For each pair of brioche bread, spread one side with butter and the other slice with the mince pie filling (NOTE: the more generous you are with the mince pie filling, the sweeter the pudding will be).  Arrange sandwiches in a well-buttered baking pan.
  • Pour the milk and egg mixture over the bread slices.  Allow the milk and egg mixture to be absorbed (if you leave the bread for about 5 mins, this will give it time to absorb the milk and egg mixture).
  • Bake in the preheated oven for 30-35 minutes.
Yelly Eats

Blueberry Crumble Pie from Edd Kimber


I think I chose the perfect recipe from Edd Kimber’s book.  The book was a gift from Alan (who enables my cookbook addiction!).  I am diabetic which means that I can’t have as much sugar as the next person, so I figured trying a fruit recipe would be the safest bet.  I reduced the amount of sugar by about 50 grams and I was quite fortunate that the blueberries that I bought had a good sweetness and tart ratio!  Also, the crumble topping allowed me to use my pastry mixer (which I called a pastry cutter for ages, but I was told it was called a pastry mixer in bonny old England! yes, me and my Americanisms, eh?)!

Edd Kimber was the first ever winner of the Great British Bake Off.  Mind you I was rooting for Ruth Clemens but it was a completely undeniable truth that Edd had the gift!

The book is lovely and the pictures are gorgeous!  They seem scream out to you, “Bake me!  Bake me!”  Plus Edd’s hands looked really gentle and elegant…soooo different from my chipolata sausage fingers!  But I digress.  This is really about this lovely book!  The instructions are clear and concise and very easy to follow.  I love the way everything was described systematically: what you had to do, when you had to do it, how long you had to do it for.  I also love the layout of the book and how everything looks pristine and clean.

What I love the most is how my pie, seeing that it was the first time I’d made the pie and seeing how I’d tweaked the recipe, looked almost identical to the photo in the book.  I was beaming with pride!  Edd Kimber was happy enough to retweet the photo of the pie I posted on Twitter (yes, it was a fan girl moment, bless my giddy heart!).

You MUST try Edd’s recipes.  I’ve got a challenge set up for myself to try the macaron recipes next.  But if  you want a wonderful fruit pie recipe that’s easy to make and comes out beautifully, this book should become one of your regulars in your recipe arsenal!  It is absolutely YUM!